Data Sharing
What Is Data Sharing
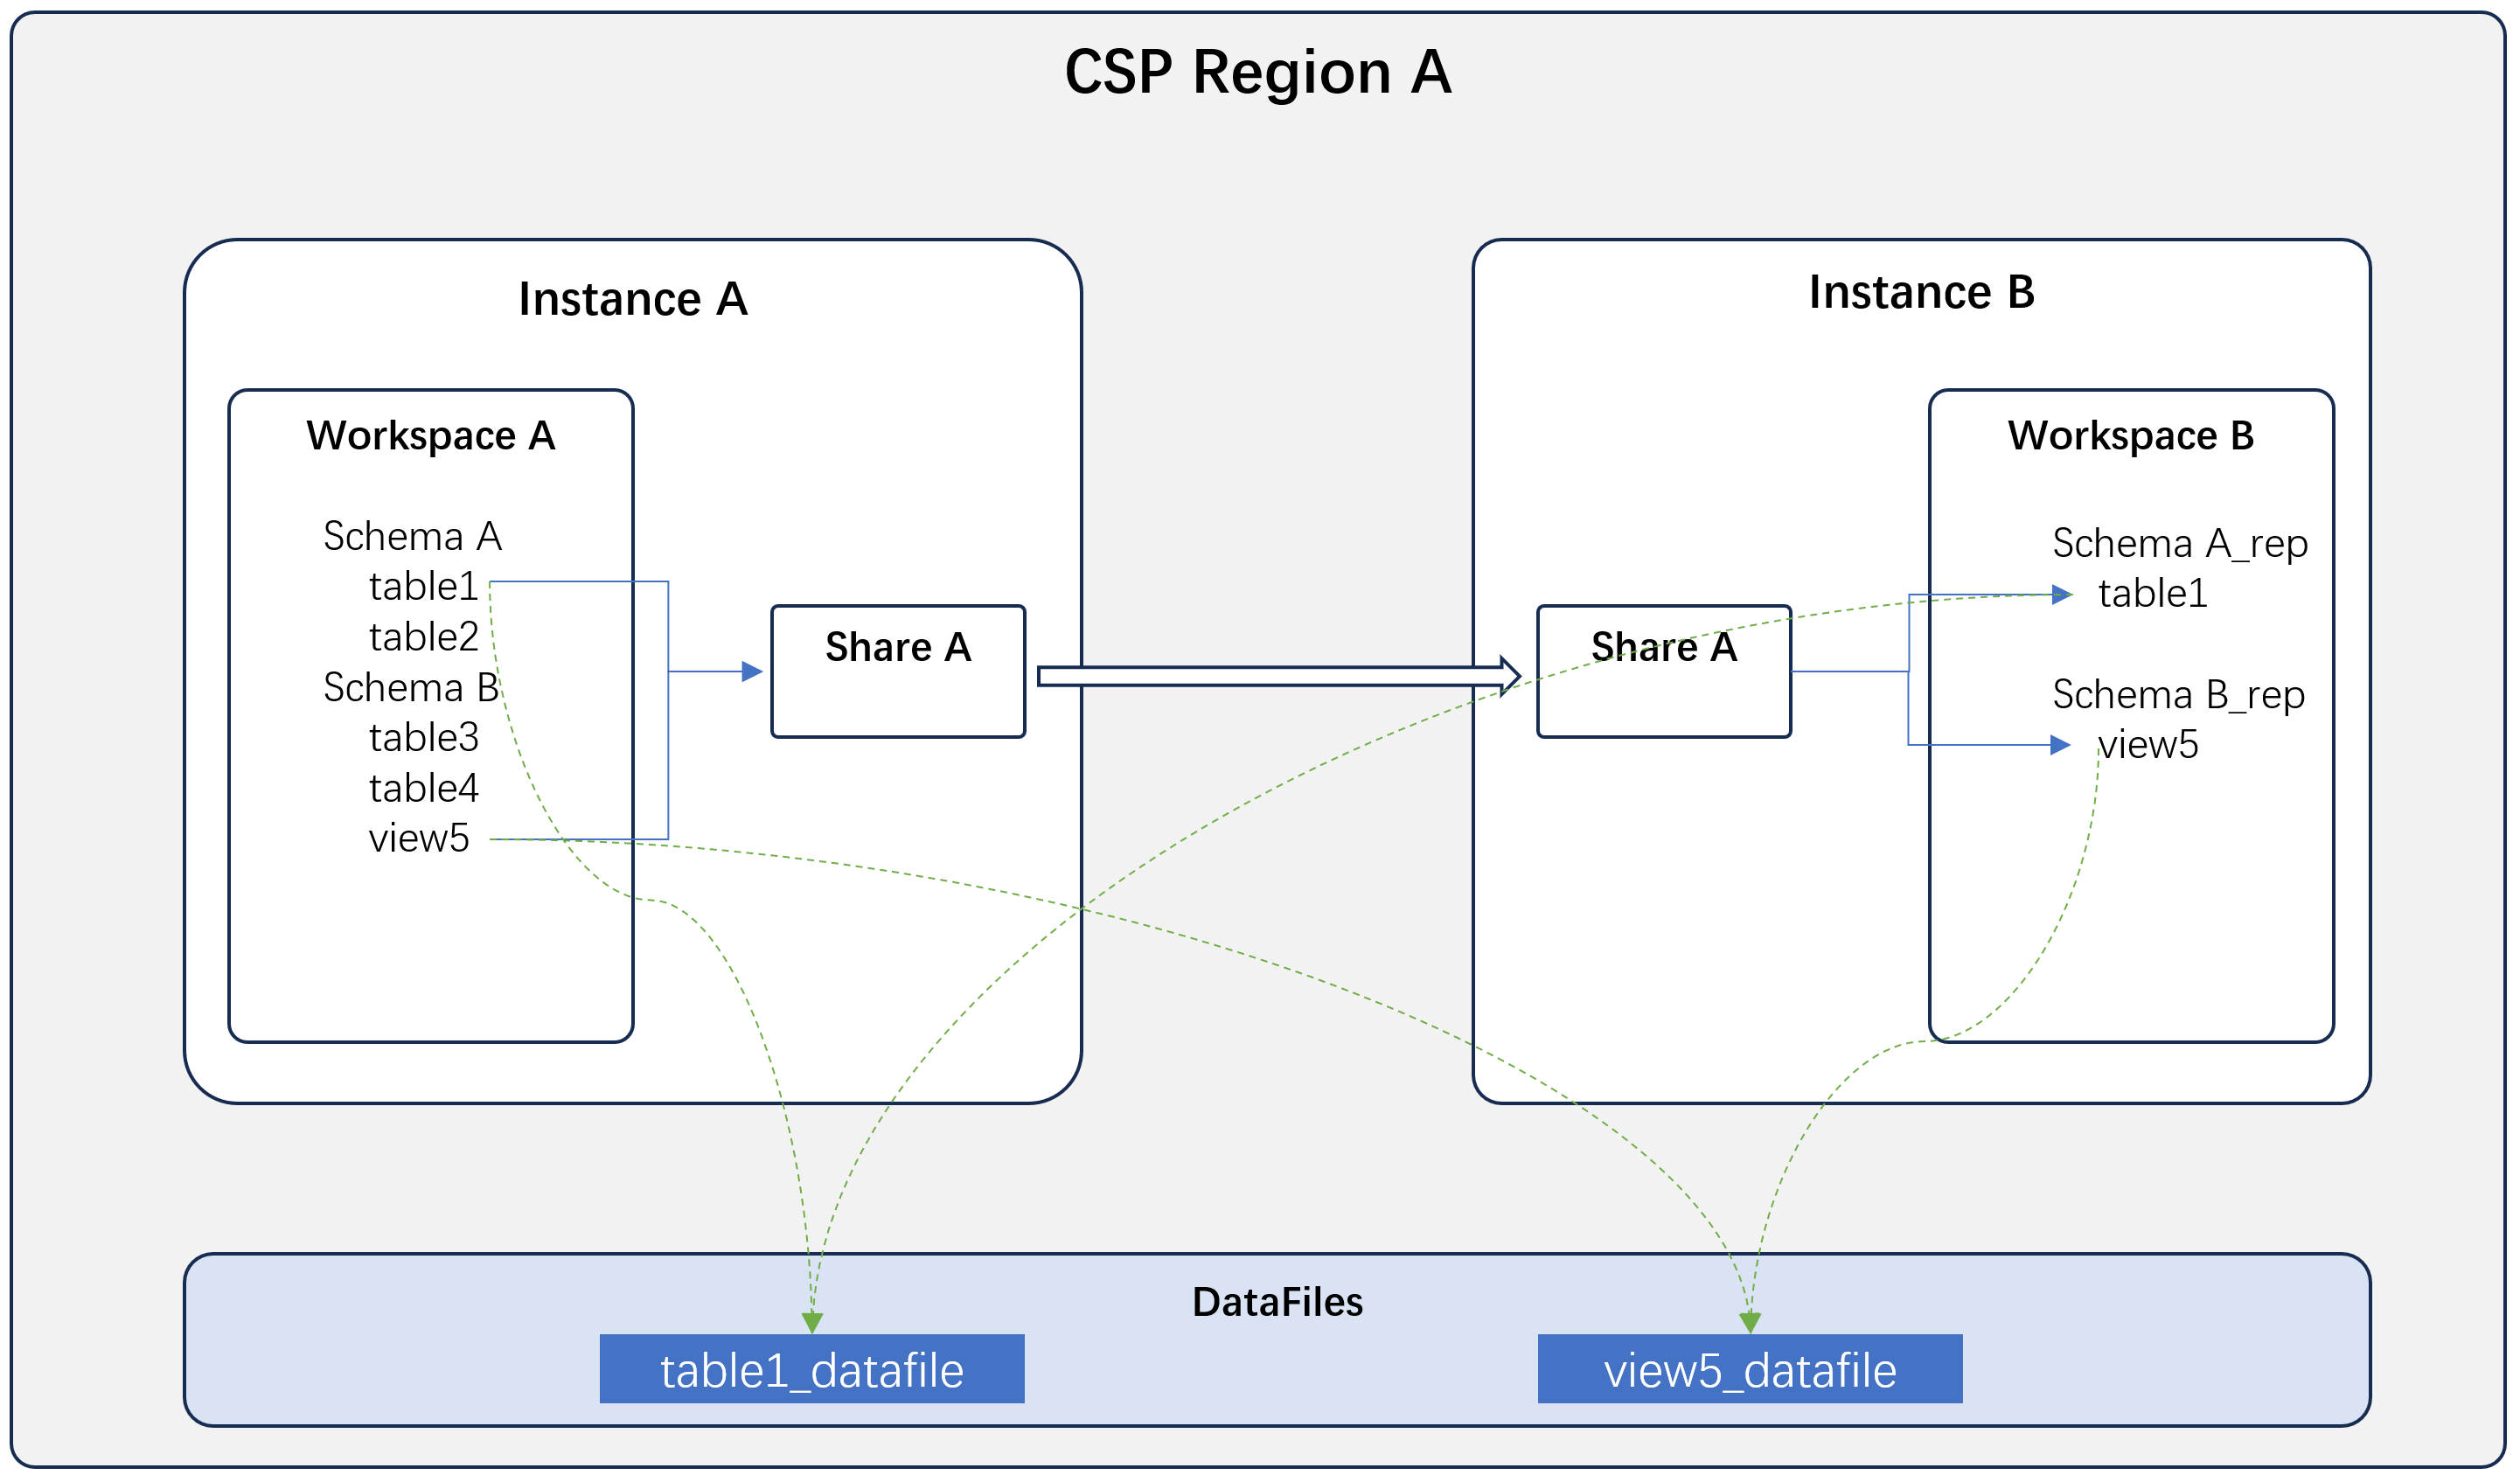
Data sharing is a zero-copy data sharing feature provided by Singdata Lakehouse, used for cross-account or cross-service-instance data authorization within the same service region. In Singdata Lakehouse, users can share data from specified tables or views with other accounts within the same service region through a share object, without actually copying the data to other accounts.
Based on the data sharing feature, accounts can conveniently and securely share data and perform associative calculations with their own data, fully unlocking data value.
Data shared through share objects is secured via permission controls. Data providers can cancel the sharing of specified data at any time by managing share permissions.
Data consumers do not need to pay for the storage resources of shared data, but must use their own compute resources to process the shared data. When shared data changes, data consumers immediately receive the latest data without needing data synchronization.
Typical Application Scenarios
Company A needs to provide its data to its client Company B, requiring real-time data updates while avoiding the high cost of establishing a real-time data synchronization pipeline. In this case, Company A can create a share object, grant the required data to the share object, and designate the share to Company B's service instance in Singdata Lakehouse. Company B can then immediately use the data shared by Company A.
Notes
- Shared data is "read-only." Consumers are not allowed to modify, delete, or perform other write operations on the data.
- The workspace where a share object is created determines the scope of data objects that can be added to that share. Cross-workspace data objects are not supported.
- A single share object can share up to 1,000 tables or views.
- To share a subset of data from a table, it is recommended to create a corresponding view based on the sharing needs and then share the view.
- Shared data prohibits secondary sharing by data consumers to protect the data provider's rights.
- Currently, data consumers cannot be prevented from copying shared data, so data providers need to carefully select the scope of shared data.
DDL Commands for Data Sharing
Data Objects Supported by Share
Currently supported share data objects are: tables and views.
You can use all tables in schema <schema_name> and all views in schema <schema_name> to add all tables and views under a specified schema to a share object. This operation includes "future" tables and views created in the specified schema, so proceed with caution.
Data Sharing Operations (Provider)
Web Interface
1. Create a share object
To ensure data security, share objects must be created by users with the "Instance Administrator" (instance_admin) role. Click "Data Management" - "Data Sharing" in the left menu to enter the data sharing list page.
Click "+ New Share" to open the new data sharing window:
-
Fill in the "Share Name" for the data share.
-
Select "Workspace," which refers to the workspace containing the tables or views to be shared. A single data share object can only contain data from one workspace.
-
In the data object row, click "Add." Select the specific tables or views to include in the data share. Multiple selections are allowed. Note that tables and views originating from other shares cannot be selected, because data sharing authorization does not permit secondary sharing. Data shares created via the web interface only support including existing tables and views; specifying "future" tables or views under an entire schema is not yet supported.
-
In the recipient instance row, click "Add." Enter the name of the service instance that needs to receive the data. Service instance names are globally unique within the Lakehouse service. Consumer users can find their service instance name on the right side of the homepage or in the service instance URL and provide it to the sharer for configuration.
Note:
- To ensure data security with workspace-level isolation, only users with the Workspace Administrator role can add data objects from their managed workspace to a data share.
- In the create share dialog, "Create" and "Add Data" are two separate operations. Even if adding shared data fails partially or completely, it does not affect the creation of the share object. When any operation fails, an error message is returned. You can click on an already-created share in the data sharing list to continue adding data objects or recipient service instances.
2. Query created share objects
All share objects created within the current service instance are displayed on the "Data Sharing" list page. Users with the Instance Administrator role (instance_admin) or Workspace Administrator role (workspace_admin) can view the list of share objects.
3. View share details
On the "Data Sharing" list page, click a specific share name to view detailed information about the share, including basic information, recipient service instances, and shared data objects. Users with the Instance Administrator role (instance_admin) or Workspace Administrator role (workspace_admin) can view share object details.
4. Add/Remove shared data objects
Users with the Workspace Administrator role for the workspace to which the share belongs can add or remove data objects (tables or views) from the share.
On the data sharing list page, click the name of the share object to which you want to add data objects, entering the share details page. Click the "Edit" button, and in the dialog select the data objects to add or remove. Click "Confirm" to complete updating the shared data objects. Data originating from other share objects cannot be added.
Added data objects become immediately visible to share consumers and appear in their schema for extracting data.
5. Configure share targets
You must configure the recipient service instance name (instance_name) for the share object to complete data sharing. The service instance name needs to be provided by the data consumer.
6. Delete a share object
Users with the Instance Administrator role (instance_admin) or the Workspace Administrator role (workspace_admin) for the workspace to which the share belongs can delete share objects.
On the data sharing list page or in the share details, click the "Delete" button under "Actions" to delete the share object. Once a share object is deleted, it cannot be recovered. Data consumers immediately lose access to the shared data.
Using SQL
1. Create a share object
To ensure data security, share objects must be created by users with the "Instance Administrator" (instance_admin) role. When creating a share object, execute the following statement in the workspace where you plan to share data:
2. Add data objects to a share
A newly created share object initially contains no data objects. Use the GRANT statement to add data objects to be shared. The syntax is:
Example:
You can use all tables in schema or all views in schema to add all current and future tables or views under a specified schema to a share. For example:
When adding data objects to a share, the user executing the operation must have SELECT (query) and READ METADATA (view metadata) privileges on the involved tables or views, and must be able to grant them onward (with grant option). The Workspace Administrator role (workspace_admin) inherently has the above privileges.
To remove shared data objects from a share, use the REVOKE statement:
Note: When sharing a table or view, since the table or view always exists under a schema, the schema's metadata privilege (read metadata) is also automatically added to the share. When removing a table or view from a share, the metadata privilege of its owning schema is also automatically removed.
3. Configure share targets
You must configure the recipient service instance name (instance_name) for the share object to complete data sharing. The service instance name needs to be provided by the data consumer.
Service instance names are globally unique within the Lakehouse service. Consumer users can find their service instance name on the right side of the homepage or in the service instance URL and provide it to the sharer for configuration.
The syntax for the data provider to configure share targets is:
Where ADD adds and REMOVE removes. This operation takes effect immediately. You can add or remove target instances from a share at any time. A share object can be shared with multiple service instances.
After completing the above three steps, data sharing to the specified service instance is complete.
4. Query created share objects
You can execute the SHOW command to query created share objects. The syntax is:
Where:
- provider is the tenant name of the share provider;
- provider_instance is the service instance name of the share provider;
- provider_workspace is the workspace to which the share belongs;
- scope is the sharing scope of the share. Currently only PRIVATE is supported -- sharing to specified instances;
- to_instance is the service instance name(s) to which the share is shared. Multiple instance names are separated by commas (,);
- kind is the share type. OUTBOUND indicates data shared from the current service instance; INBOUND indicates data shared from other service instances to the current service instance.
5. Query data objects shared by a specified share
Execute the following statement to query the data objects granted in a share:
6. Delete a share object
Execute the following command to delete a share object created by the current service instance:
Once a share object is deleted, it cannot be recovered. Data consumers immediately lose access to the shared data.
Using Shared Data (Consumer)
Web Interface
1. View shared data
Users with the Instance Administrator (instance_admin) role or Workspace Administrator (workspace_admin) role can view all share objects shared to the current service instance in the "Shared With Me" tab under the "Data Sharing" menu.
Click a share object name to view details including the source, reception time, and the data (tables or views) currently contained in the share.
2. Extract shared share to create a schema
On the "Shared With Me" list page or the share details page, click the "Extract" button to extract data from the share.
When extracting data, extraction can only be done at the schema level. Individual table or view extraction is not yet supported.
First, select "Source Schema," which is the schema from which to extract data. If the share contains multiple schemas, you need to perform multiple extractions.
Then select the target workspace for data extraction and enter the schema name for storing the data. The extraction operation creates a new schema in the target workspace and stores the data from the source schema. Note that this schema is "read-only" once created; you cannot create other data objects within it.
After completing the above selections and input, click "Confirm" to complete data extraction.
3. Use shared data
After completing data extraction, you can see all tables and views shared under that schema from the share object within the specified schema. You can then execute SELECT queries on these tables and views or perform JOIN queries with other tables and views.
Shared data is marked with a special icon in the "Data" panel for easy identification.
Using SQL
1. View shared data
Data consumers can query shared share objects using the SHOW SHARES command. The usage and result format are the same as step 3 of the provider section.
Furthermore, you can use the DESC SHARE command to query which schemas and tables are included in the shared share.
2. Create a schema from a shared share
Data shared through a share requires creating a corresponding schema on the consumer side before it can be queried and used. The operation statement is:
Where <provider_instance> and <share_name> can be obtained from the SHOW SHARES command results; <schema_name> can be obtained by querying with DESC SHARE <share_name>.
The schema name in CREATE SCHEMA <schema_name> can be customized and does not need to match the schema name in the share.
When executing the above command, the operator must have permission to create schemas in the target workspace. The Workspace Administrator role (workspace_admin) inherently has this permission.
3. Use shared data
After executing CREATE SCHEMA FROM SHARE, you can see all tables and views shared under that schema from the share object within the specified schema. You can then execute SELECT queries on these tables and views or perform JOIN queries with other tables and views.
Share Object Permissions
1. Provider permissions
Only users with the Instance Administrator (instance_admin) role can create share objects. The permission points for share operations are as follows. Granting share object permissions to other roles or users via the GRANT statement is not currently supported.
| Permission | Description |
|---|---|
| Create share | Permission to create share objects. |
| Alter share | Permission to modify share objects, add or remove shared instance IDs. |
| Drop share | Permission to delete share instances. |
| Read metadata | Permission for SHOW SHARES and DESC SHARE. DESC SHARE returns the objects and granted object privileges within the share. |
| Grant objectprivilege to share / Revoke objectprivilege from share | Add or remove data objects from a share: GRANT objectPrivilege TO; REVOKE objectPrivilege FROM. |
2. Consumer permissions
All members in a workspace have USE and READ METADATA permissions on share objects. However, the CREATE SCHEMA permission in the workspace is required to create a schema from the data in a share.
| Permission | Description |
|---|---|
| Use | Permission to use the share. |
| Read metadata | Permission to query share metadata. After obtaining this, SHOW SHARES and DESC SHARE can be executed. |