
CDC and Data Processing via Singdata Lakehouse Multi-Table Real-Time Sync and Dynamic Tables
Overview
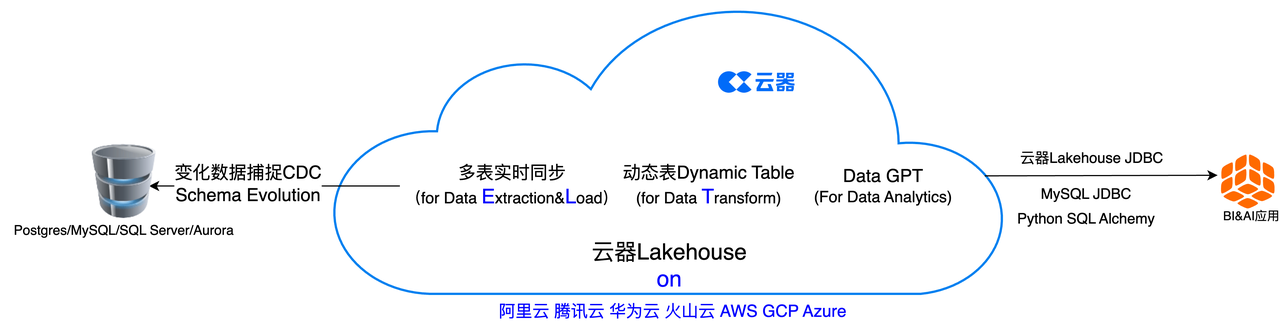
In this quickstart, we will explore how to use customer transaction data stored in a PostgreSQL database, ingest it into Singdata Lakehouse tables via Singdata Lakehouse's multi-table real-time sync, process it in real time using Dynamic Tables, and further perform visual data exploration and conversational data analysis through Singdata Lakehouse's built-in Data Analytics Agent (DataGPT). This creates a real-time end-to-end pipeline covering data ingestion, processing, and analysis to gain insights into customer transactions.
From an ELT perspective, Singdata Lakehouse's multi-table real-time sync handles CDC-based Data Extraction and Loading, including Schema Evolution — meaning the sync captures structural or schema changes in the source database. Dynamic Tables provide a new approach to Data Transformation.
What is CDC and Why Use It
CDC (Change Data Capture) is a technique that syncs only the data that has changed, rather than copying an entire table each time. It works similarly to a database binlog — every insert, update, and delete is recorded, and downstream systems consume these change events to stay in sync with the source.
Full-table sync is fine at small scale, but as data volume grows, the time window for each full copy gets longer and resource consumption multiplies. CDC transmits only incremental changes, reducing latency to seconds while significantly lowering the load on the source database and network.
The data flow architecture for this tutorial is:
PostgreSQL (source database) → Singdata Multi-Table Real-Time Sync (CDC extraction + loading) → Lakehouse Tables (raw data landing) → Dynamic Table (incremental auto-transformation) → Data Analytics Agent (DataGPT) (conversational analysis)
After completing this tutorial, you will have:
- A real-time CDC sync pipeline from PostgreSQL to Lakehouse
- An automated incremental data processing workflow based on Dynamic Tables
- A real-time dataset you can query directly via the Data Analytics Agent (DataGPT)
Prerequisites:
-
Docker installed on your local machine
-
A tool for connecting to a PostgreSQL database
- For example, Visual Studio Code, DBV/DBGrid, or Python scripts
-
Basic familiarity with Python and SQL
-
Familiarity with data science Notebooks
-
An existing Singdata account, or go to the Singdata registration page to sign up for a free account. After registration, you can log in to the Singdata Lakehouse Web console.
Singdata Lakehouse Environment
Overview
You will use Singdata Lakehouse Studio (the Singdata Lakehouse web interface) to create Singdata Lakehouse objects (virtual compute clusters, spaces/databases, schemas, users, etc.).
Create Objects and Load Data
- Navigate to Development -> Tasks, click
+to create a new working directory and worksheet task, then select SQL Worksheet
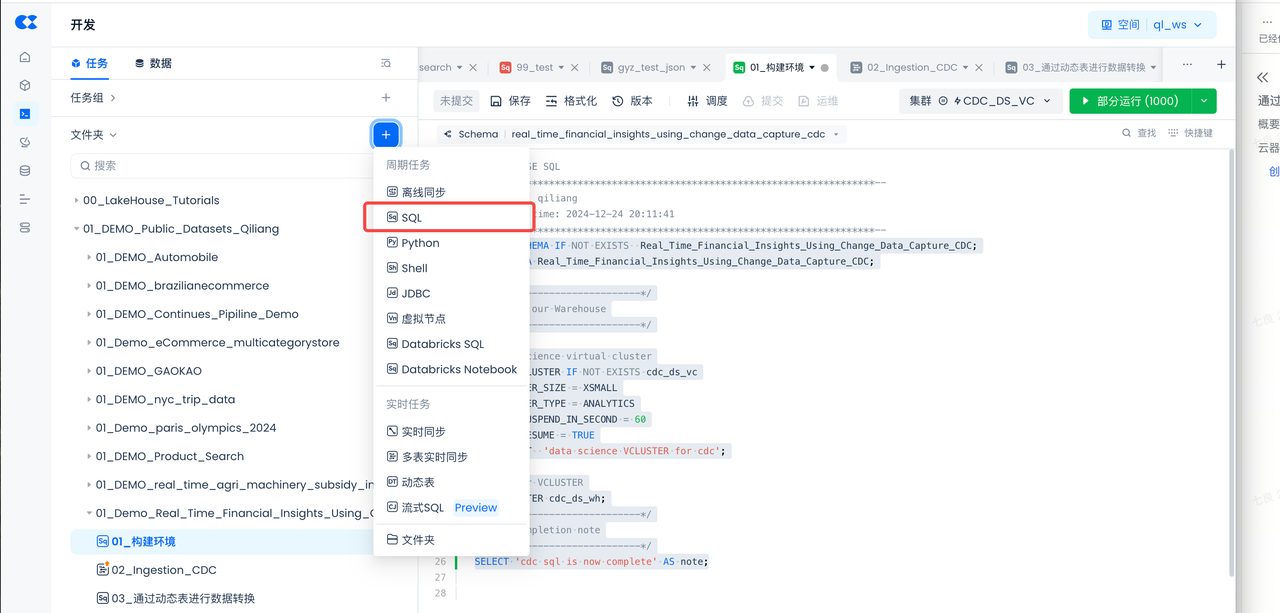
- Working directory name: 01_Demo_Real_Time_Financial_Insights_Using_Change_Data_Capture_CDC
- Task name: 01_Setup_Environment
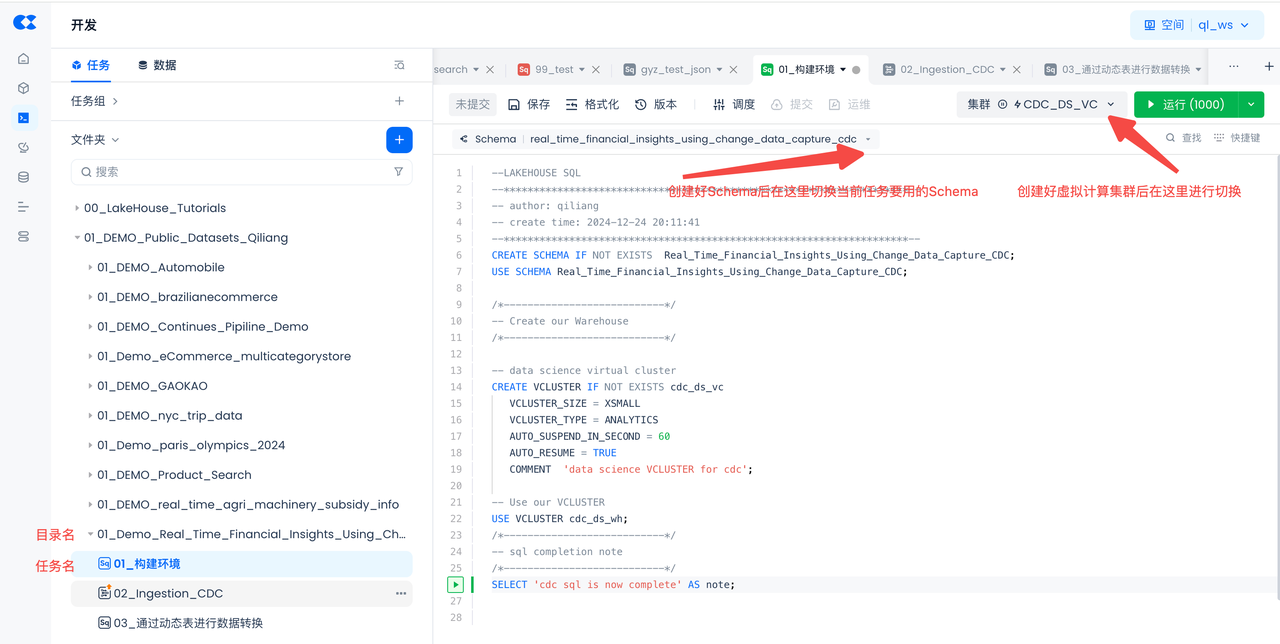
- Copy and paste the following SQL script to create Singdata Lakehouse objects (virtual compute cluster, database schema), then click "Run" at the top of the worksheet
Postgres Environment
Overview
In this section, we will set up a PostgreSQL database and create tables to simulate customer transaction data for a financial company.
Start the Database Instance
Before starting this step, make sure Docker Desktop is installed for Mac, Windows, or Linux. Ensure Docker Compose is also installed on your machine.
- To start a PostgreSQL database using Docker, you need to create a file named docker-compose.yaml. This file will contain the configuration for the PostgreSQL database. If you have another container client, start the container using the PostgreSQL image below.
- Open your IDE of choice (e.g., VS Code) and copy-paste the following content into the file:
- Open a terminal and navigate to the directory containing the docker-compose.yaml file. Run the following command to start the PostgreSQL database:
Connect to the Database
To connect to the pre-configured database using Visual Studio Code, DBV/DBGrid/PyCharm, or any IDE of your choice, follow these steps using the provided credentials:
-
Open your chosen tool to connect to the PostgreSQL database
- For VSCode, you can use the PostgreSQL extension
- For PyCharm, you can use the Database Tools and SQL plugin
-
Click the
+symbol or similar to add a data source -
Use these connection parameters:
- User:
postgres - Password:
postgres - URL:
jdbc:postgresql://localhost:5432/
- User:
-
Test the connection and save
-
To allow Singdata Lakehouse Studio to access the Postgres database over the public internet, be sure to configure public NAT mapping for the Postgres database.
Load Data
- Run the following postgres script in PostgreSQL to create the database, schema, and tables:
-
Download these CSV files and save them to a directory on your local machine:
-
Postgres data loading method 1: load via PostgreSQL COPY command
- Before loading data into the PostgreSQL database, we need to move the files from the local machine to the Docker container.
- Open your terminal and use the following command to get the Docker container ID:
-
- To copy the CSV files to the container, run the following commands in the terminal, replacing the file paths with your actual file paths and replacing
container_idwith the actual container ID from the previous command: -
- Return to the PostgreSQL console and run the following SQL commands to load the files from the container into the PostgreSQL tables:
- Postgres data loading method 2: load via Python script
Copy the following code into a Python file or Notebook and run it. You can also directly download this Python file.
Database connection info:
Set search_path:
Set the CSV file directory:
Iterate over all CSV files in the directory and load them into the corresponding tables:
Close the cursor and connection:
- Next, make sure to run the
CREATE PUBLICATIONcommand to enable logical replication for tables in theraw_cdcschema. This allows the real-time sync task below to capture changes made to tables in the PostgreSQL database:
A Publication is part of PostgreSQL logical replication. It lets users define a set of table changes (inserts, updates, deletes) that will be delivered to one or more subscribers. Logical replication is one implementation of CDC — it captures and propagates data changes in database tables. In short, after running this statement, PostgreSQL will capture data changes across all tables in the database, and those changes can be received and processed by subscribers, enabling CDC-based change tracking.
- Finally, verify the tables are correctly loaded by running the following SQL commands:
Create and Start the Singdata Lakehouse CDC Multi-Table Real-Time Sync Task
Overview
You will use Singdata Lakehouse Studio to create a multi-table real-time sync task through the UI in a no-code manner, loading data from Postgres tables into Singdata Lakehouse tables.
Create a Postgres Data Source
Navigate to Administration -> Data Sources, click "New Data Source" and select Postgres to create a Postgres data source, making Postgres accessible to Singdata Lakehouse.

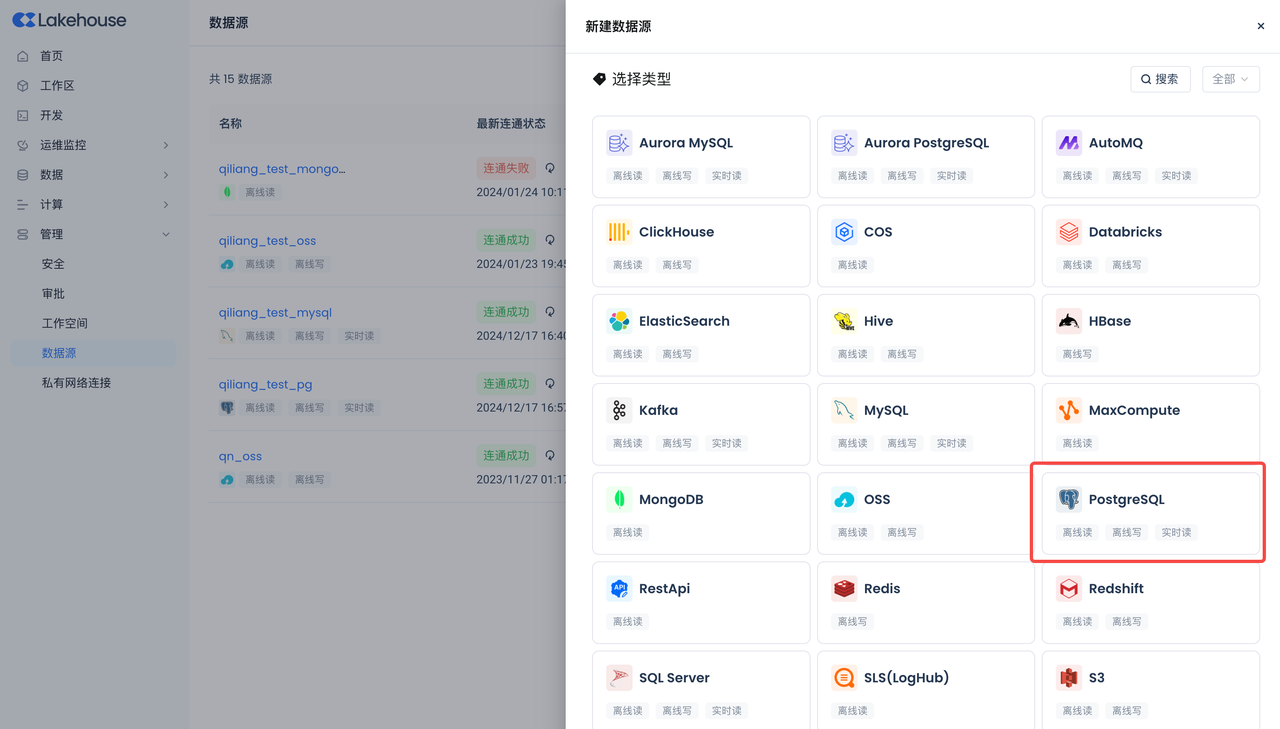
- Data source name: PG_CDC_DEMO
- Connection parameters: same as the Postgres environment connection parameters above.
- Make sure to configure the correct timezone for the database to avoid sync failures.
Create the Multi-Table Real-Time Sync Task
Navigate to Development -> Tasks, click + to create a new working directory and task, then select "Multi-Table Real-Time Sync".
- Select "Multi-Table Real-Time Sync":

Create the multi-table real-time sync task and store it in the same directory created during environment setup:
- Task name: 02_Ingestion_CDC
- Source data: select Postgres
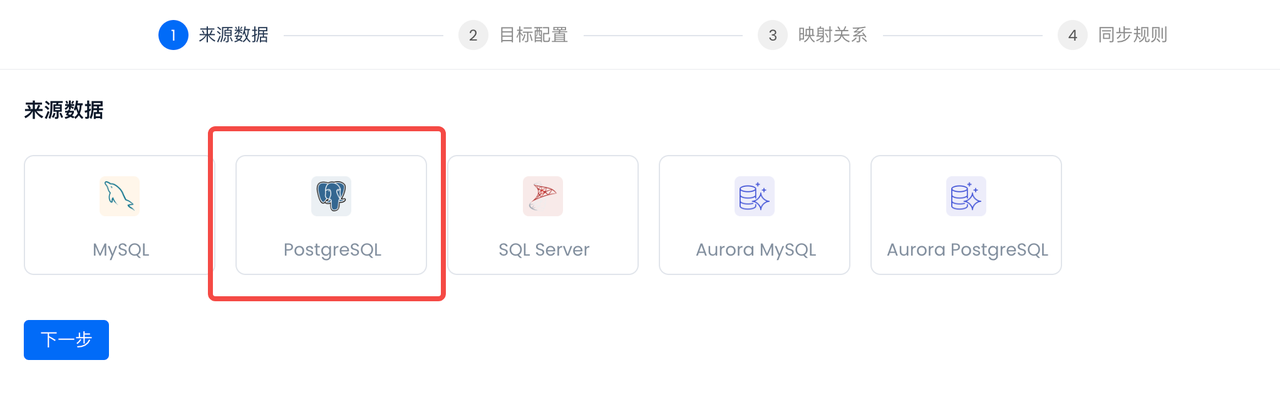
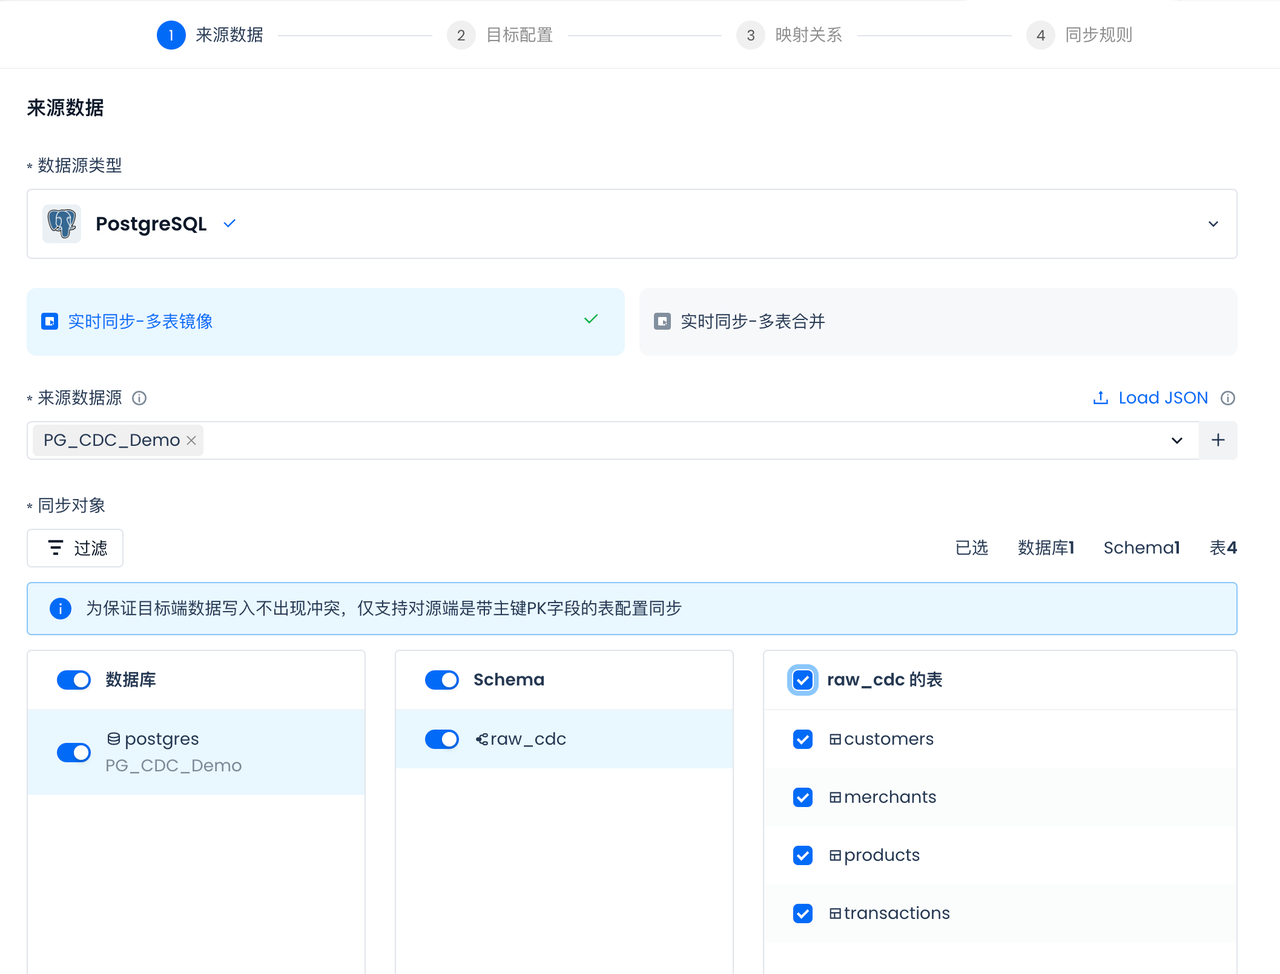
For the source data, select the Postgres data source created in the previous step: PG_CDC_DEMO. After selecting it, the accessible databases, schemas, and tables for that data source will be shown automatically. Select all tables (all tables need to be synced):
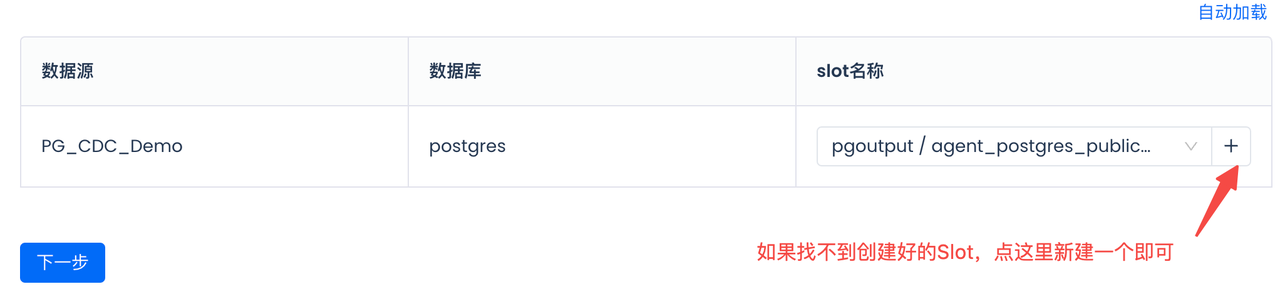
Select or create a SlotName for CDC sync. Note that the same slot should not be shared by two tasks, as this can cause data loss:
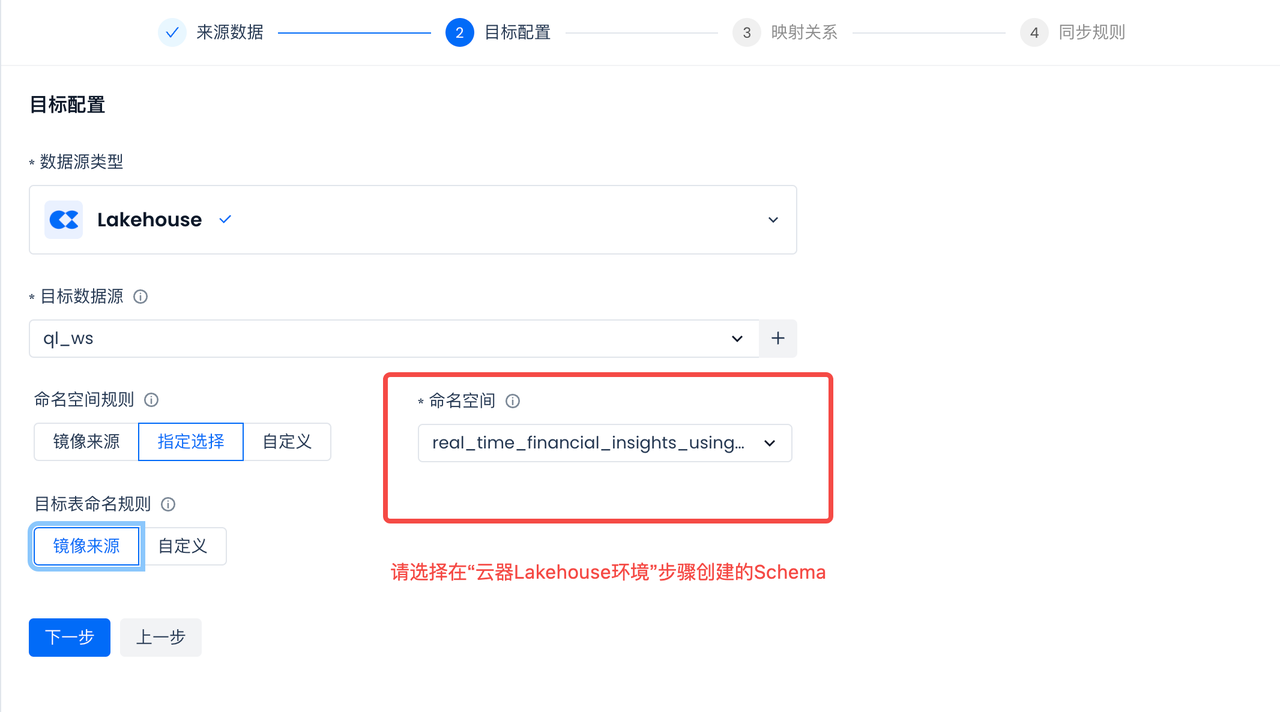
Target table configuration:
Select an existing schema under the target data source as the storage location for target tables.
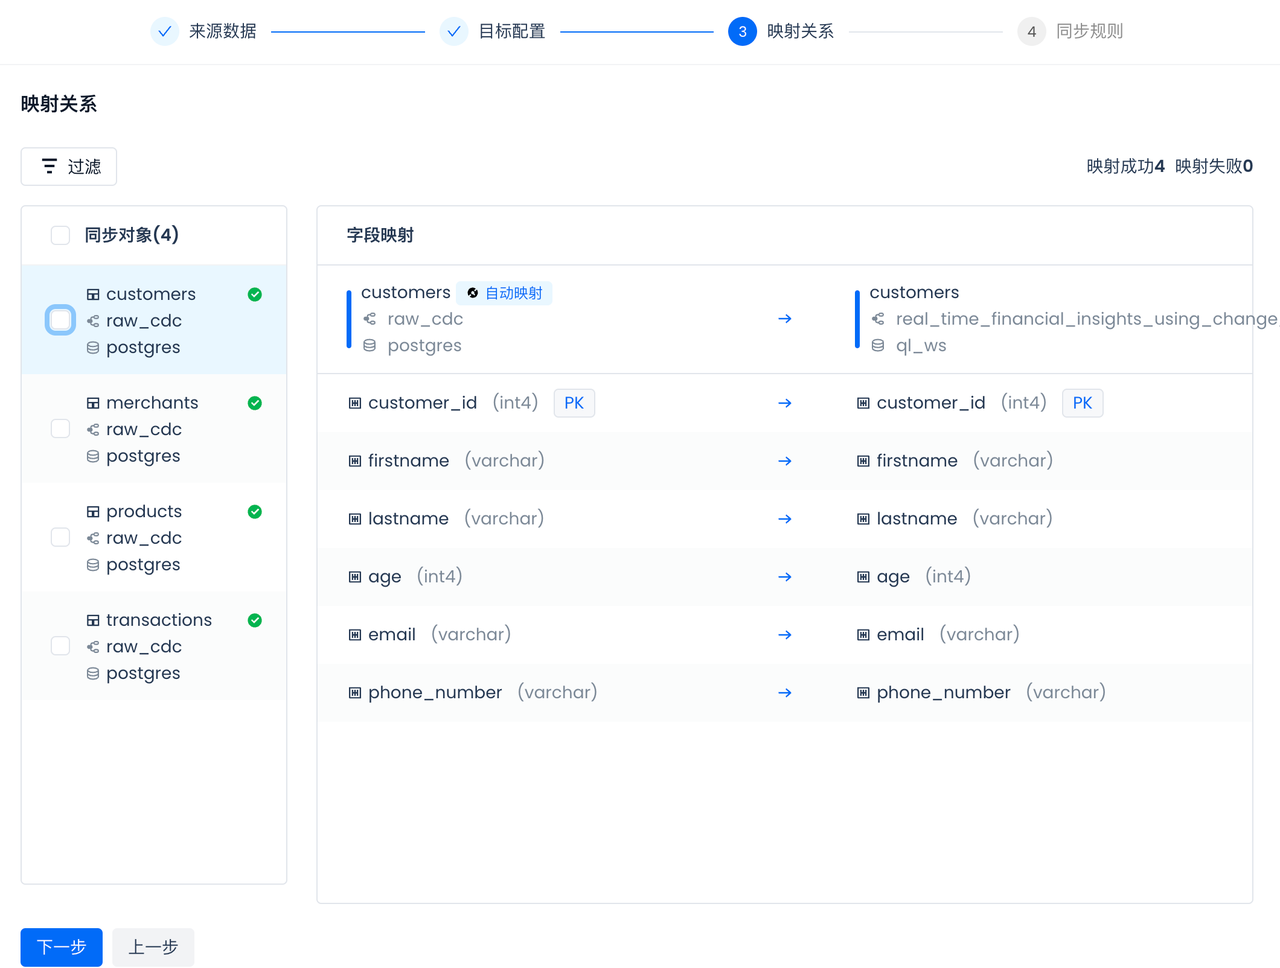
Configure and review the table and field mapping:
Singdata Lakehouse automatically generates table and field mappings, including data type mappings. If no corresponding table exists in the selected Singdata Lakehouse namespace, the multi-table real-time sync task will automatically check and create the table when the task starts — no need to create it manually in advance. CDC sync requires primary keys on source tables. The multi-table real-time sync will automatically create the corresponding primary keys in the Lakehouse target tables.
Configure sync rules:
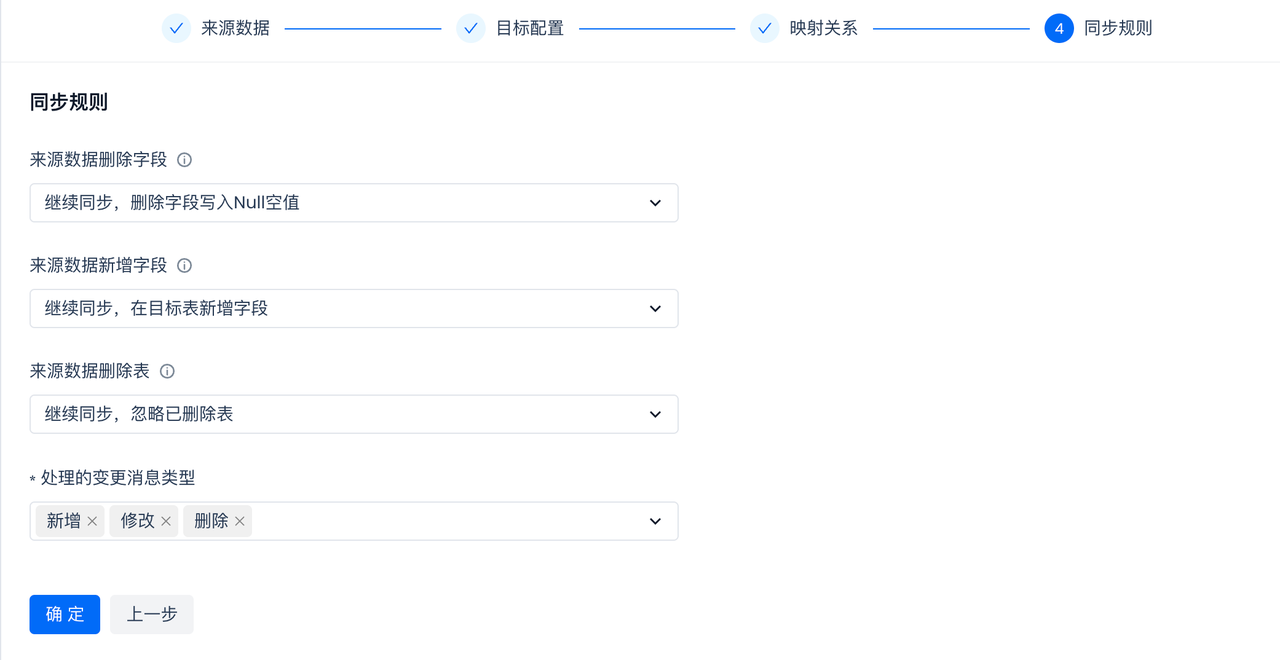
Schema Evolution refers to the process of modifying and adapting a database's structure or schema (Schema) over time as requirements change, without interrupting existing system operations or causing data loss. It typically involves changes to table structures, fields, data types, relationships, and constraints.
In the sync rules of a real-time sync task, you can configure automatic handling policies for changes to source tables and fields:
-
Set the behavior when a field is deleted from the source table.
-
Set the behavior when a new field is added to the source table. Renaming a field is treated as a deletion of the old field; the renamed field is recognized as a new field addition.
-
Set the behavior when a new field is added to the source table.
-
Set the behavior when a synced object in the data source is deleted. Renaming a table is treated as a deletion, and the renamed table is treated as a new table.
In addition, the sync rules also support specifying which types of source change messages to process. Configure as needed. For example, in some scenarios where you want target data to only accumulate and not process source "delete" changes, simply remove the "Delete" option from this configuration.
Submit and Start the Multi-Table Real-Time Sync Task
- Submit the multi-table real-time sync task:

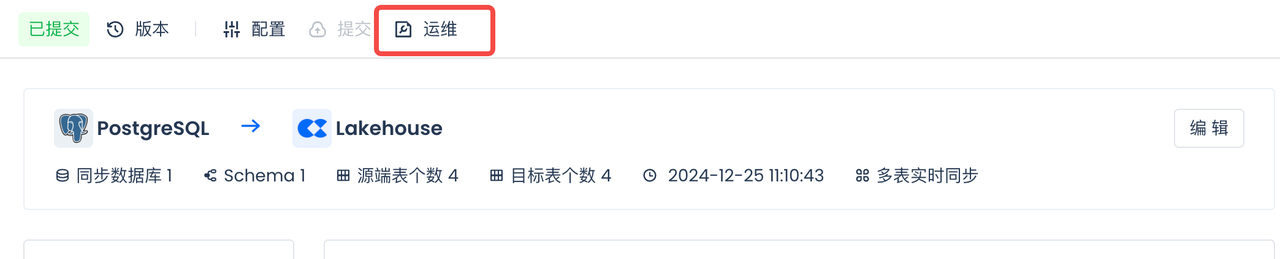
- Operations for the multi-table real-time task:
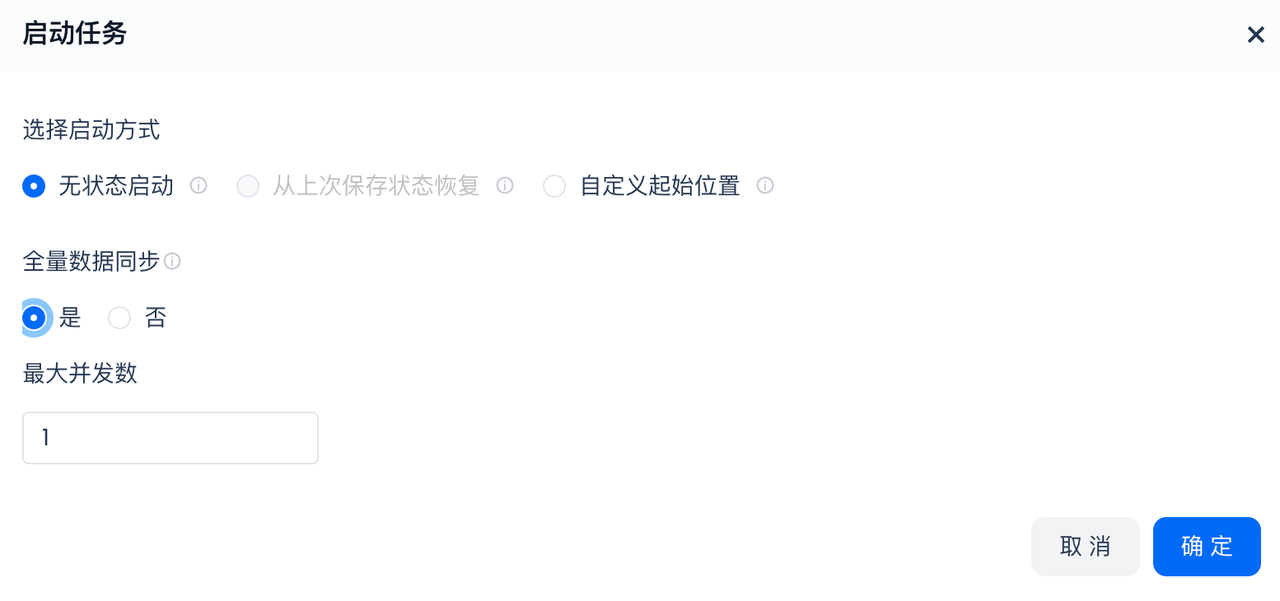
- Start the multi-table real-time task:
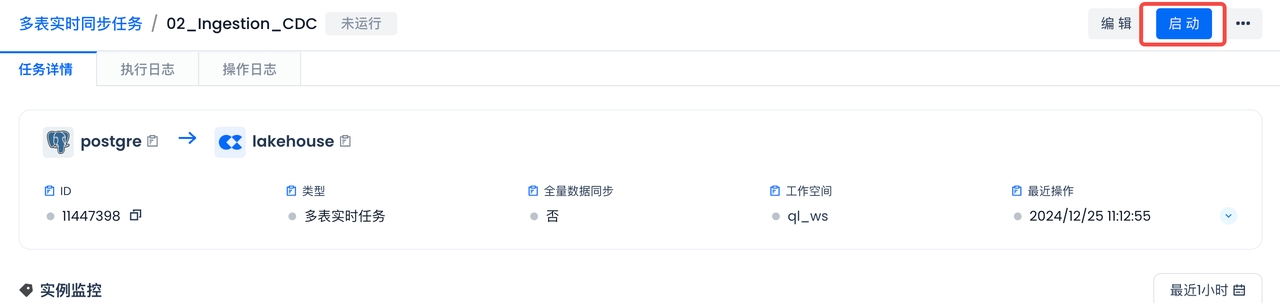
- Select "Full Data Sync":
Whether to perform a full data sync before starting incremental sync. Note that this option can only be selected the first time the task is started after going live.
View Full Sync Status
In the "Postgres Environment" section above, data was already loaded into the four Postgres tables via COPY or Python script. The "Full Data Sync" option selected in the previous step syncs all data before incremental sync begins.
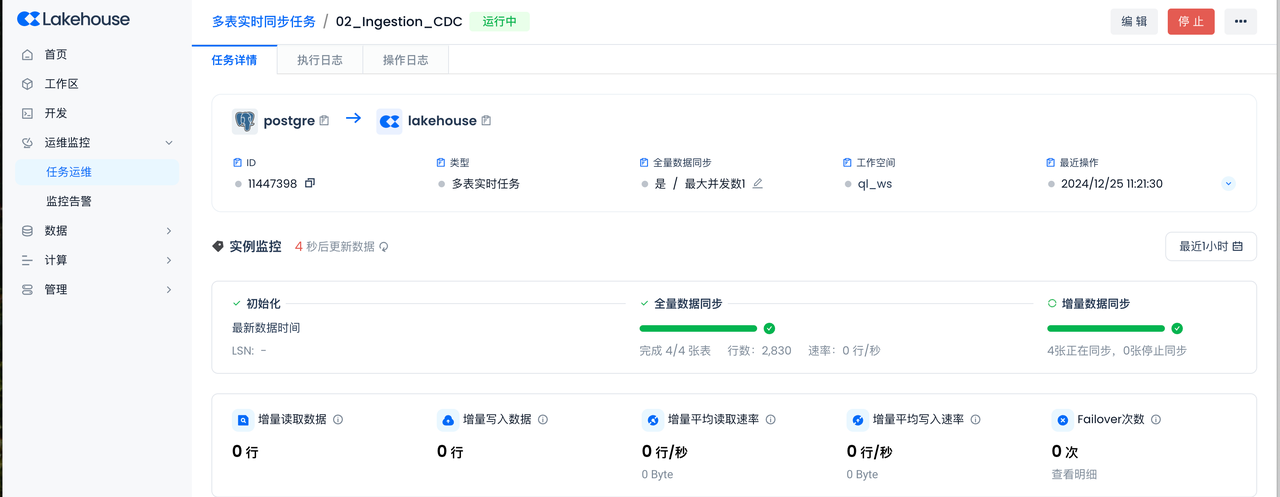
All 4 tables have normal full sync and incremental sync status with no failovers.
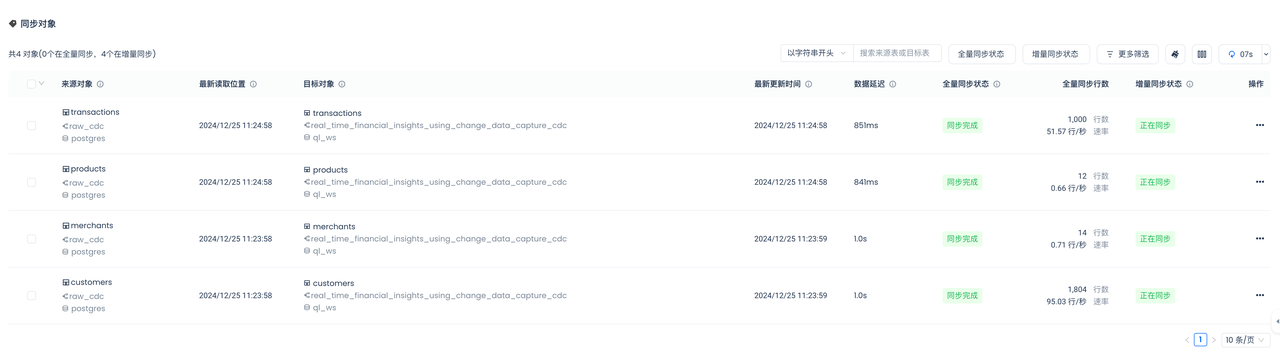
You can see that the full sync has completed. After this, the incremental sync status will automatically switch to "Syncing" without any manual intervention.
Incremental Sync Process for Multi-Table Real-Time Sync
Insert New Data into the Source
Insert data into the Postgres source tables, verify incremental data sync through the already-started real-time multi-table sync task, and check the sync task status.
During incremental sync, the multi-table real-time sync uses the Lakehouse Java Real-Time Programming Interface to write data in real time into Lakehouse primary key tables.
Copy the following code into a Notebook and run it, or download it directly:
- Create a database connection
Database connection info:
Set search_path:
- Set parameters for incremental data generation
Set parameters:
- Data loading function
- Call the function to insert transaction data
Call the function to insert transaction data:
- Close the cursor and connection
Close the cursor and connection:
View Incremental Sync Status
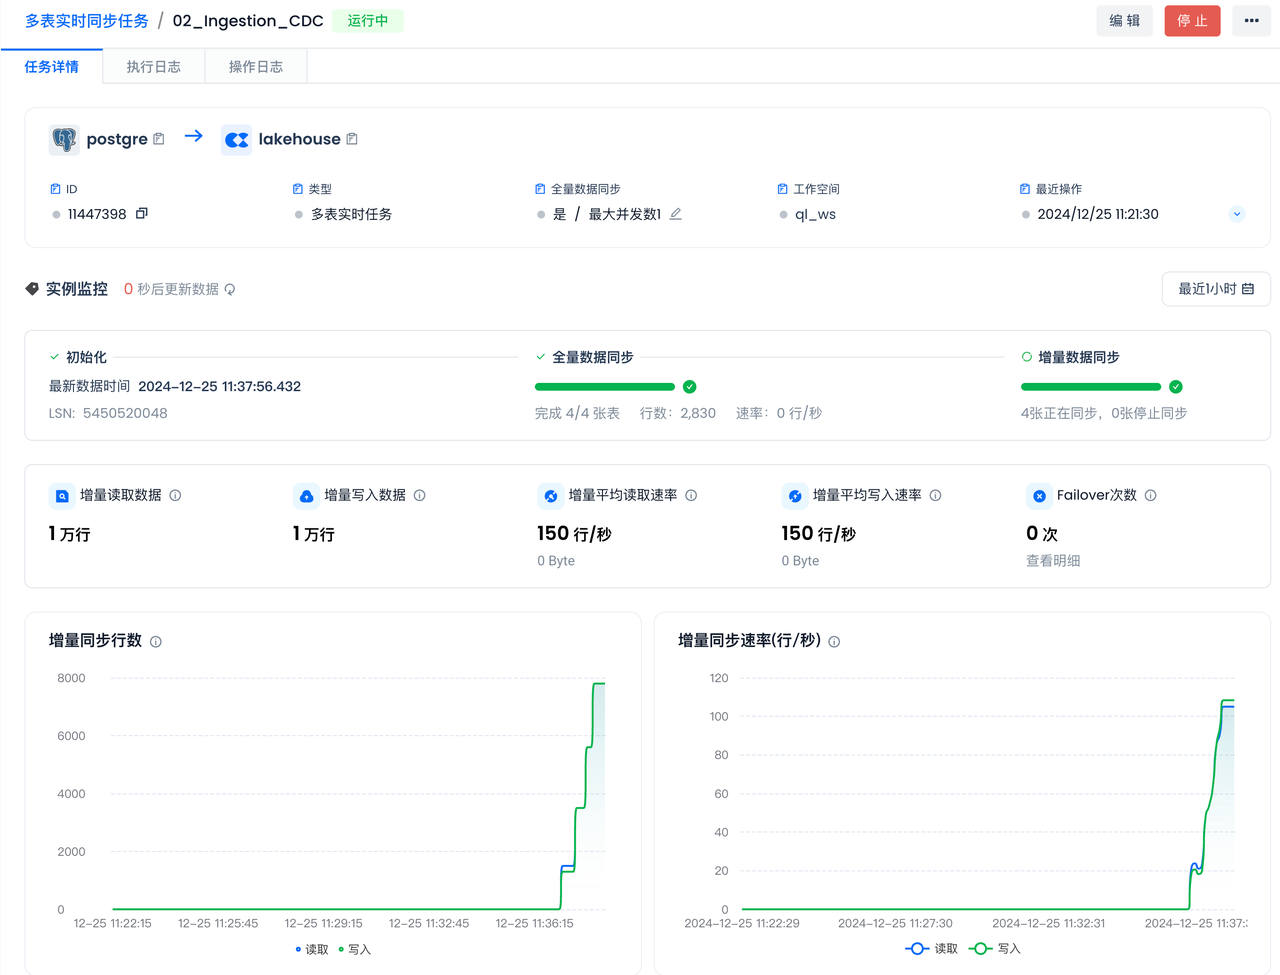
Process Data from Multi-Table Real-Time Sync Using Dynamic Tables
Overview
You will use Singdata Lakehouse Studio to create Dynamic Tables, processing in real time the data synced from Postgres tables to Singdata Lakehouse via multi-table real-time sync.
Create a Dynamic Table
Navigate to Development -> Tasks, click "+" and select "Dynamic Table".
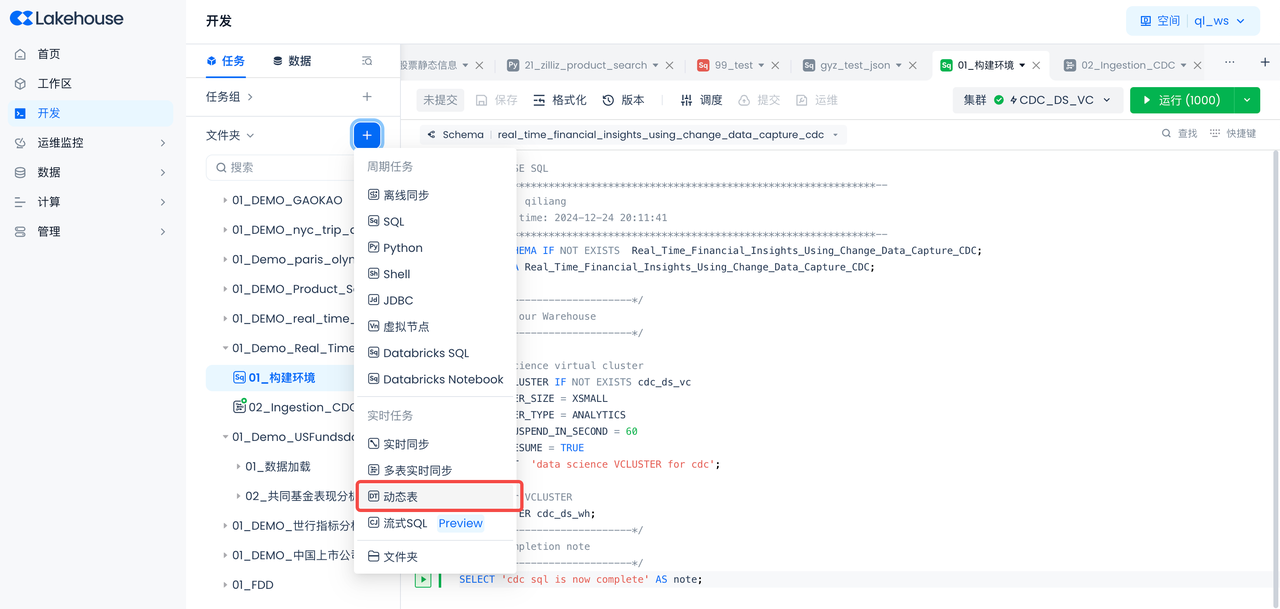
- Task name: 03_customer_purchase_summary
- Schema: real_time_financial_insights_using_change_data_capture_cdc
- Table name: customer_purchase_summary
- Enter in the SQL code field:
This SQL query retrieves detailed transaction records from the transactions table and joins related information from the customers, products, and merchants tables. Here is a detailed explanation:
-
Extract transaction records from the
transactionstable:t.transaction_id: Retrieves the unique identifier for each transaction.t.customer_id: Retrieves the identifier of the customer associated with the transaction.t.product_id: Retrieves the identifier of the product involved in the transaction.t.merchant_id: Retrieves the identifier of the merchant providing the product or service.t.transaction_dateandt.transaction_time: Retrieve the date and time the transaction occurred.t.quantity: Retrieves the quantity of products purchased in the transaction.t.transaction_card: Retrieves the card type used for the transaction (e.g., credit or debit card).t.transaction_category: Retrieves the category of the transaction (e.g., purchase or refund).
-
Extract customer information from the
customerstable:- Uses
JOIN customers c ON t.customer_id = c.customer_idto join thetransactionstable with thecustomerstable to retrieve customer information associated with the transaction. c.age AS customer_age: Retrieves the customer's age and aliases it ascustomer_age.
- Uses
-
Extract product information from the
productstable:- Uses
JOIN products p ON t.product_id = p.product_idto join thetransactionstable with theproductstable to retrieve product information for the transaction. p.product_name: Retrieves the product name.p.product_category: Retrieves the product category.t.quantity * p.price AS total_price: Calculates the total price for each transaction (quantity multiplied by unit price) and aliases it astotal_price.
- Uses
-
Extract merchant information from the
merchantstable:- Uses
JOIN merchants m ON t.merchant_id = m.merchant_id AND m.merchant_category = p.product_categoryto join thetransactionstable with themerchantstable, ensuring the merchant category matches the product category. m.merchant_name: Retrieves the merchant name.m.merchant_category: Retrieves the merchant category.
- Uses
Through these joins and data extractions, this query produces a detailed result set where each record contains full transaction details, customer information, product information, and merchant information, while also calculating the total price for each transaction — enabling more comprehensive and in-depth transaction analysis.
The Dynamic Table uses declarative syntax to refresh data on a scheduled basis, achieving the goal of dynamically updating data.
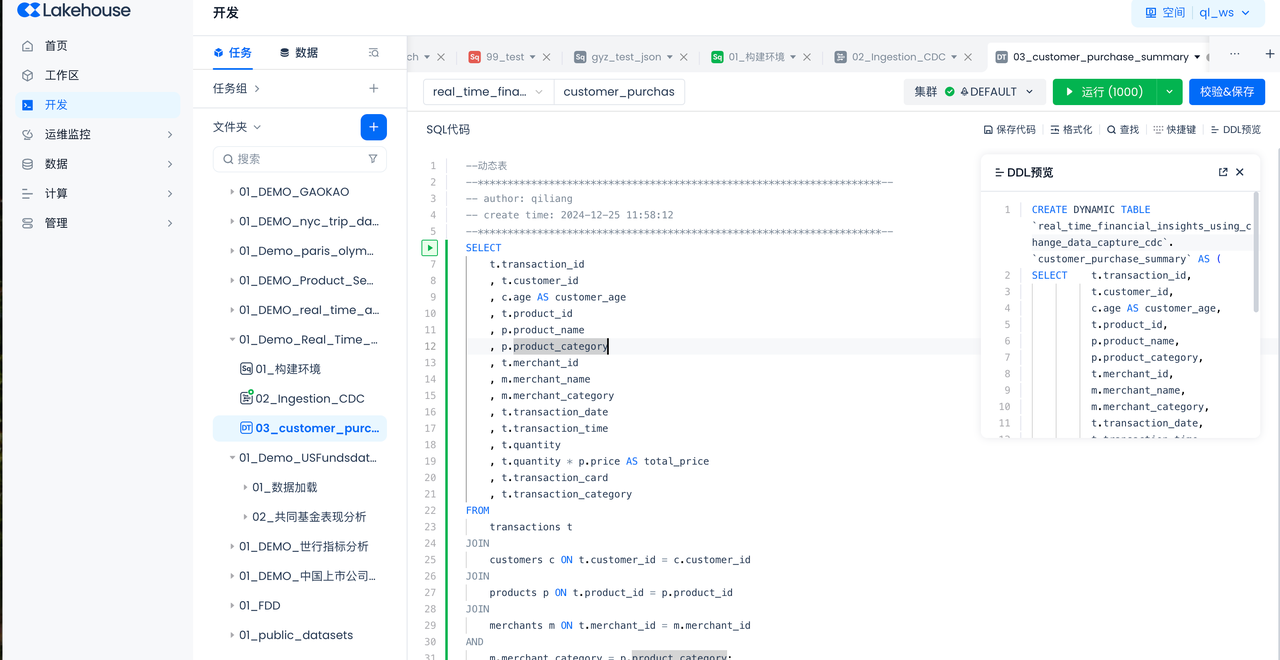
- Validate and save, then select "Complete SQL Development":

-
Before submitting, select the virtual cluster for running the Dynamic Table refresh
Select the virtual compute cluster "CDC_DS_VS" created in the "Singdata Lakehouse Environment" step.
-
Before submitting, select "Auto Refresh"
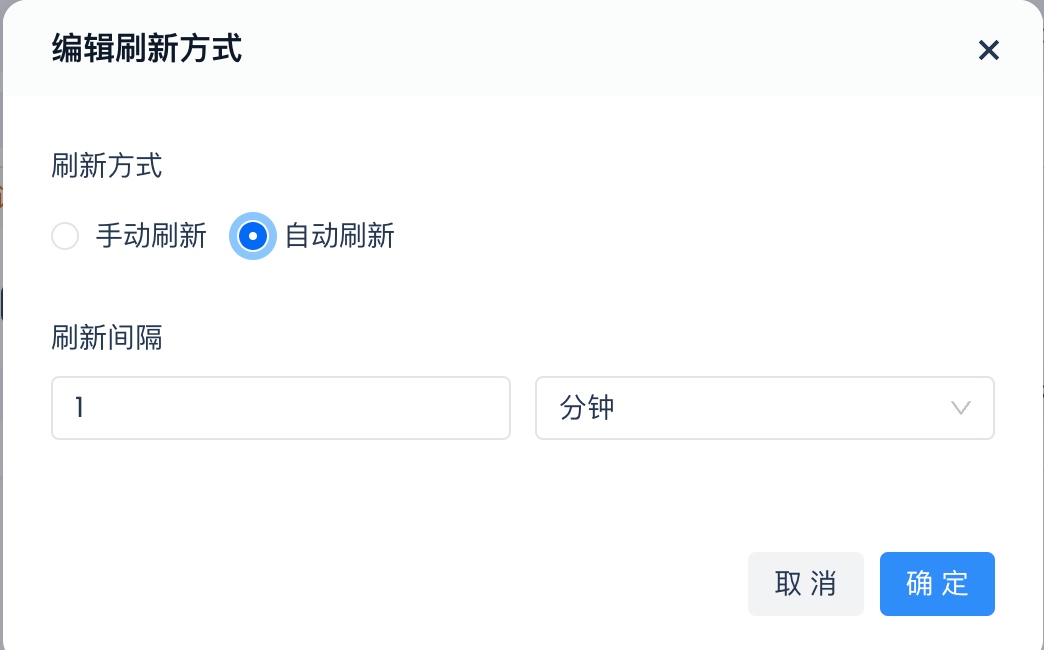
Submit and Complete Dynamic Table Development
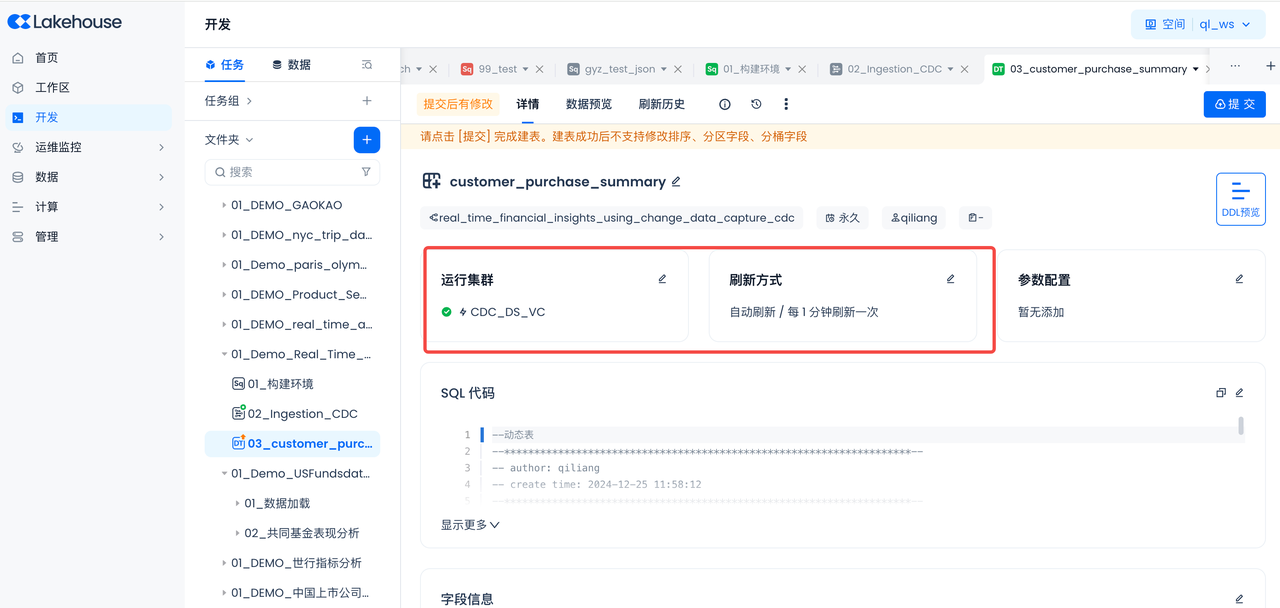
Dynamic Table Operations
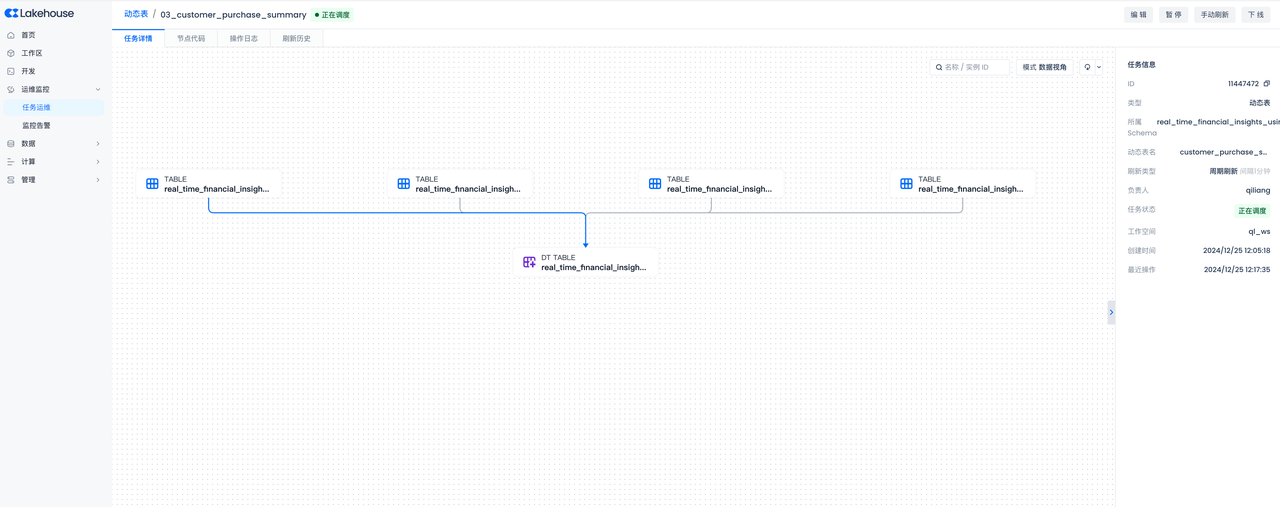
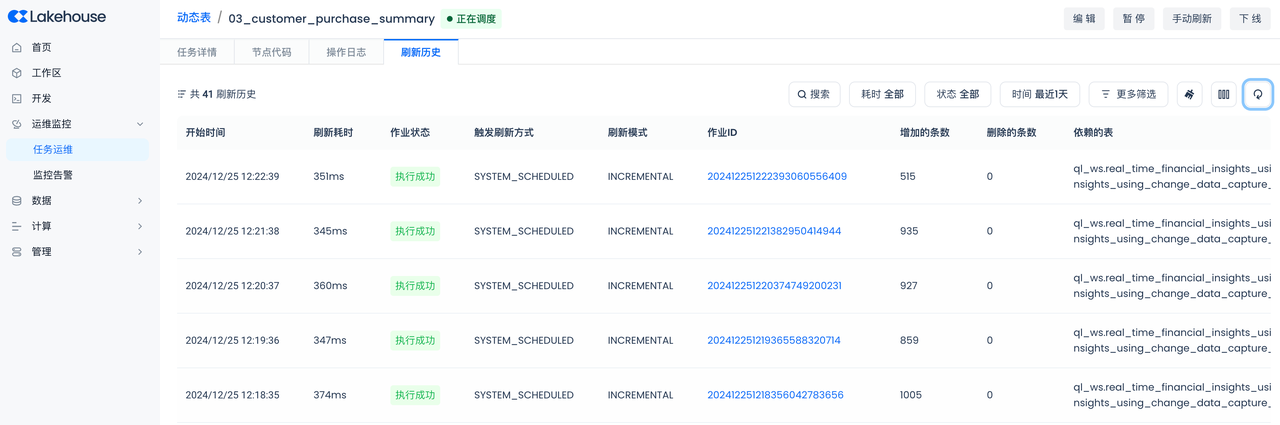
After a successful submission, you can go to the Operations Center to view the current table's task details and refresh history, with options to start or stop the current table.
- Task details:
- Refresh history:
You can see the number of rows added and deleted in each refresh cycle, giving you visibility into how the Dynamic Table data changes "dynamically".
Conversational Data Analysis via Singdata Data Analytics Agent (DataGPT)
Overview
You will use the Singdata Lakehouse Data Analytics Agent (DataGPT) to analyze the data synced from Postgres tables to Singdata Lakehouse via multi-table real-time sync through a question-and-answer interface.
Access the Singdata Data Analytics Agent (DataGPT)
Navigate to Account Home -> Data Analytics Agent (DataGPT) to enter the Singdata Data Analytics Agent (DataGPT).

Create a New Analysis Domain
Build data analysis on top of multiple data tables, metrics, Answer Builders, knowledge, and files — with support for adding users for permission isolation.
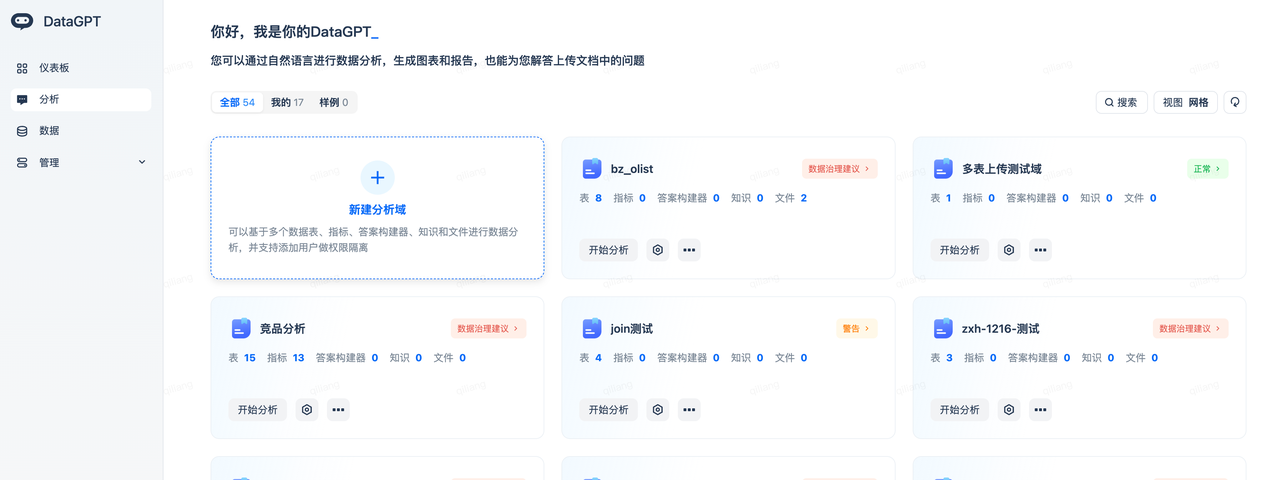
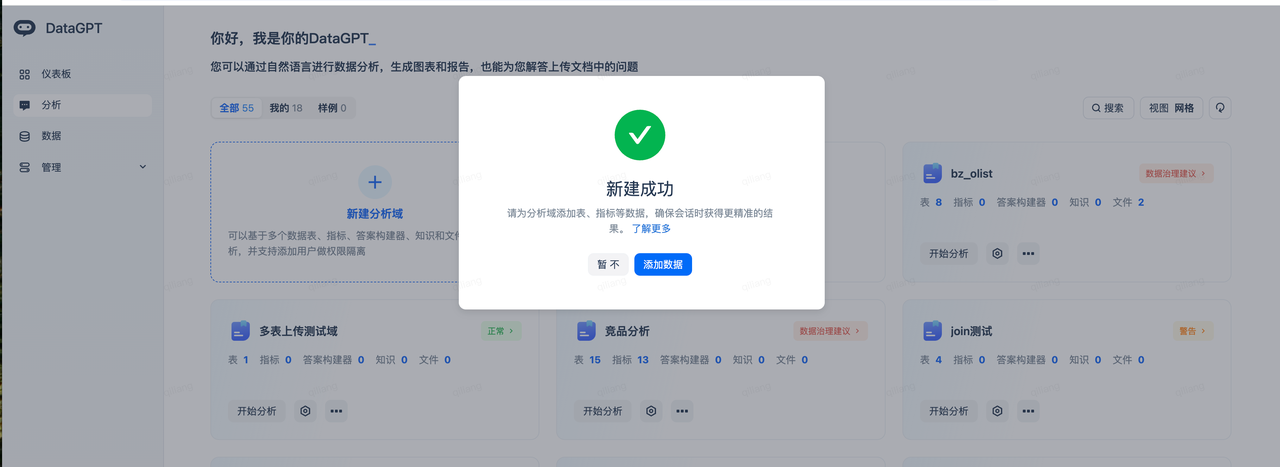
- Analysis domain name: CDC Transaction Data Analysis.
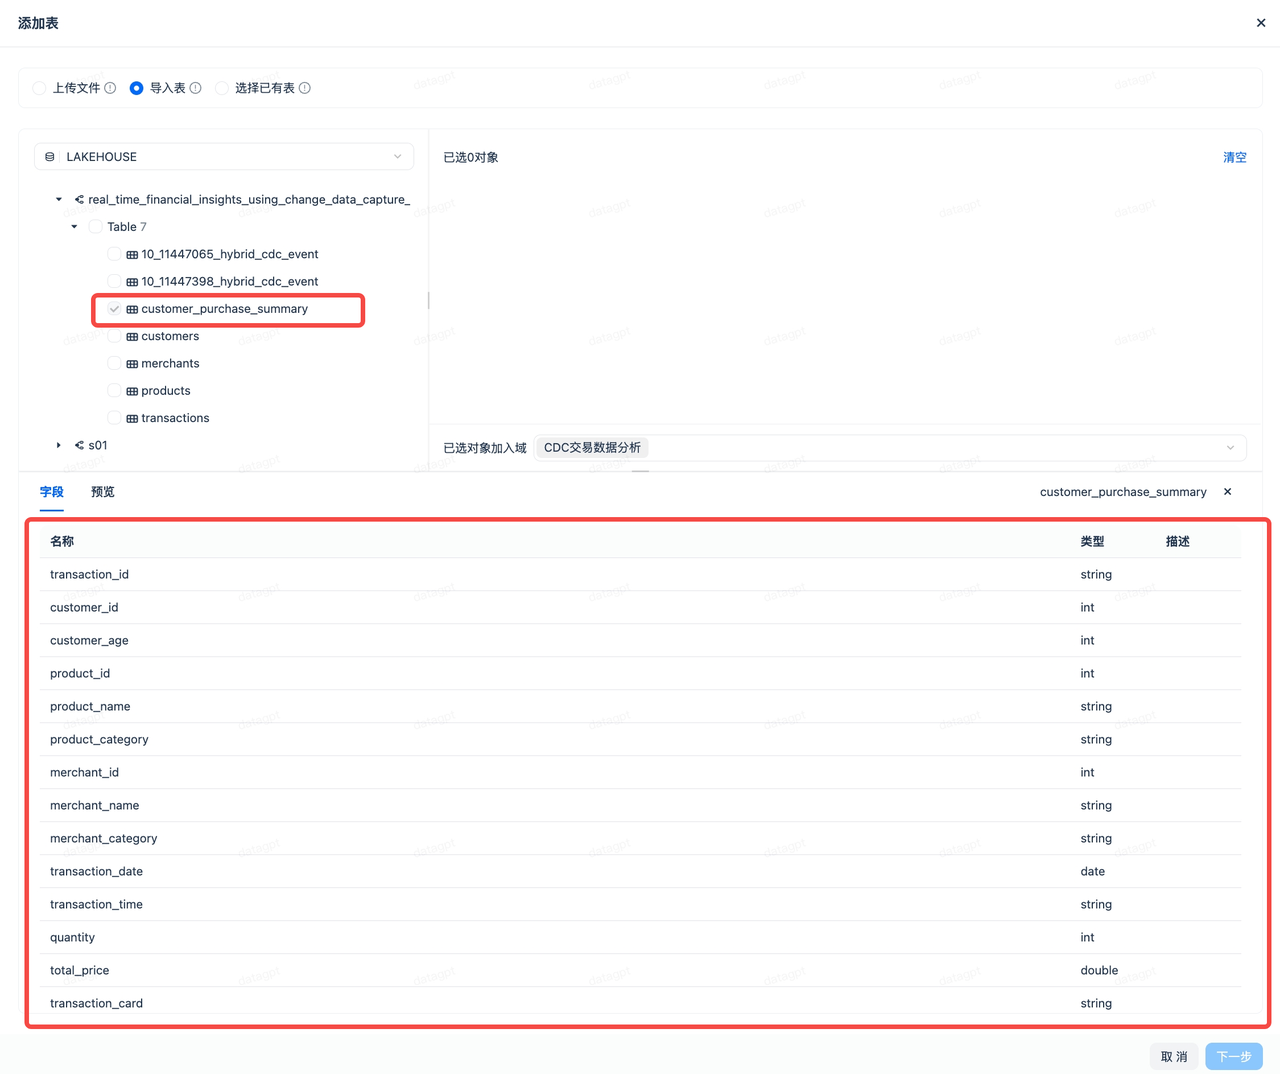
- After creation, select "Add Data", then select "Add Table" -> "Import Table" to add the Dynamic Table created in the previous section to the Data Analytics Agent (DataGPT).
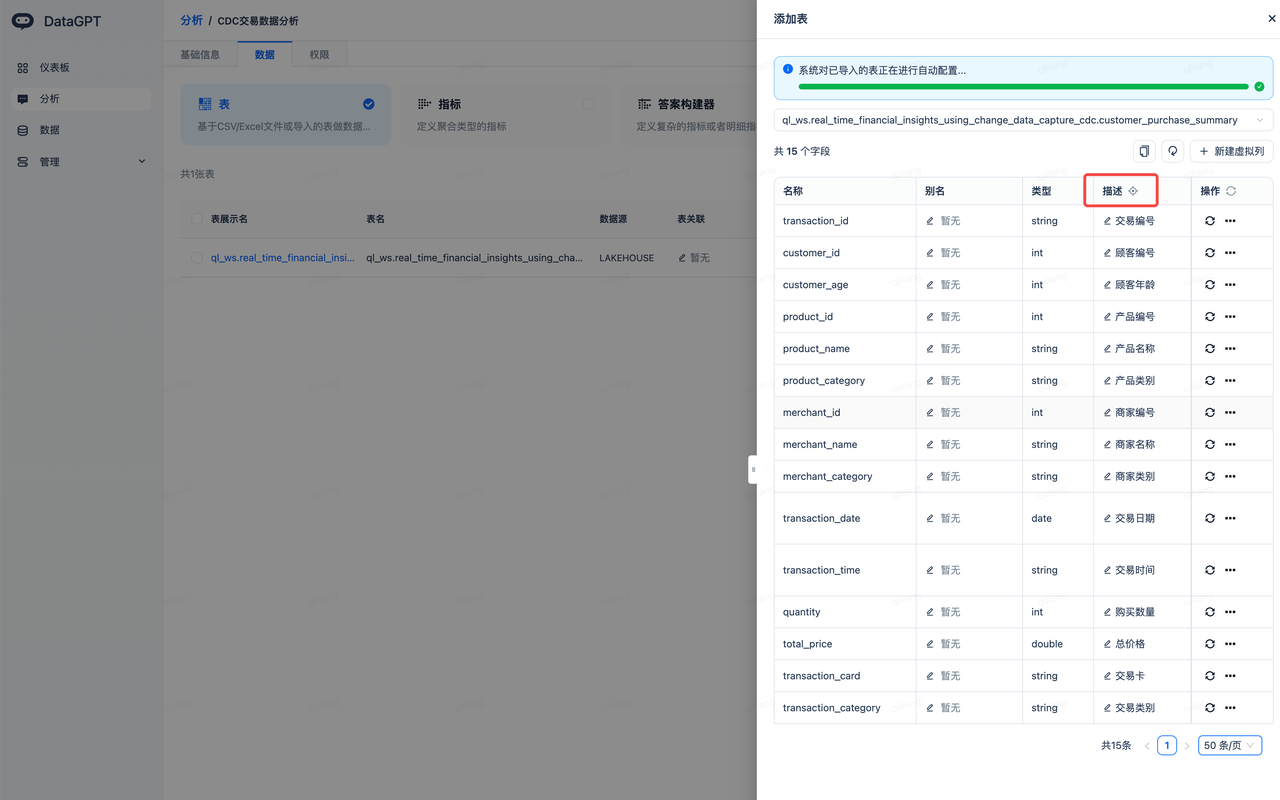
- Click the icon to the right of "Description" — the system will use a large language model to add appropriate descriptions to each field, making it easier to align natural language semantics.
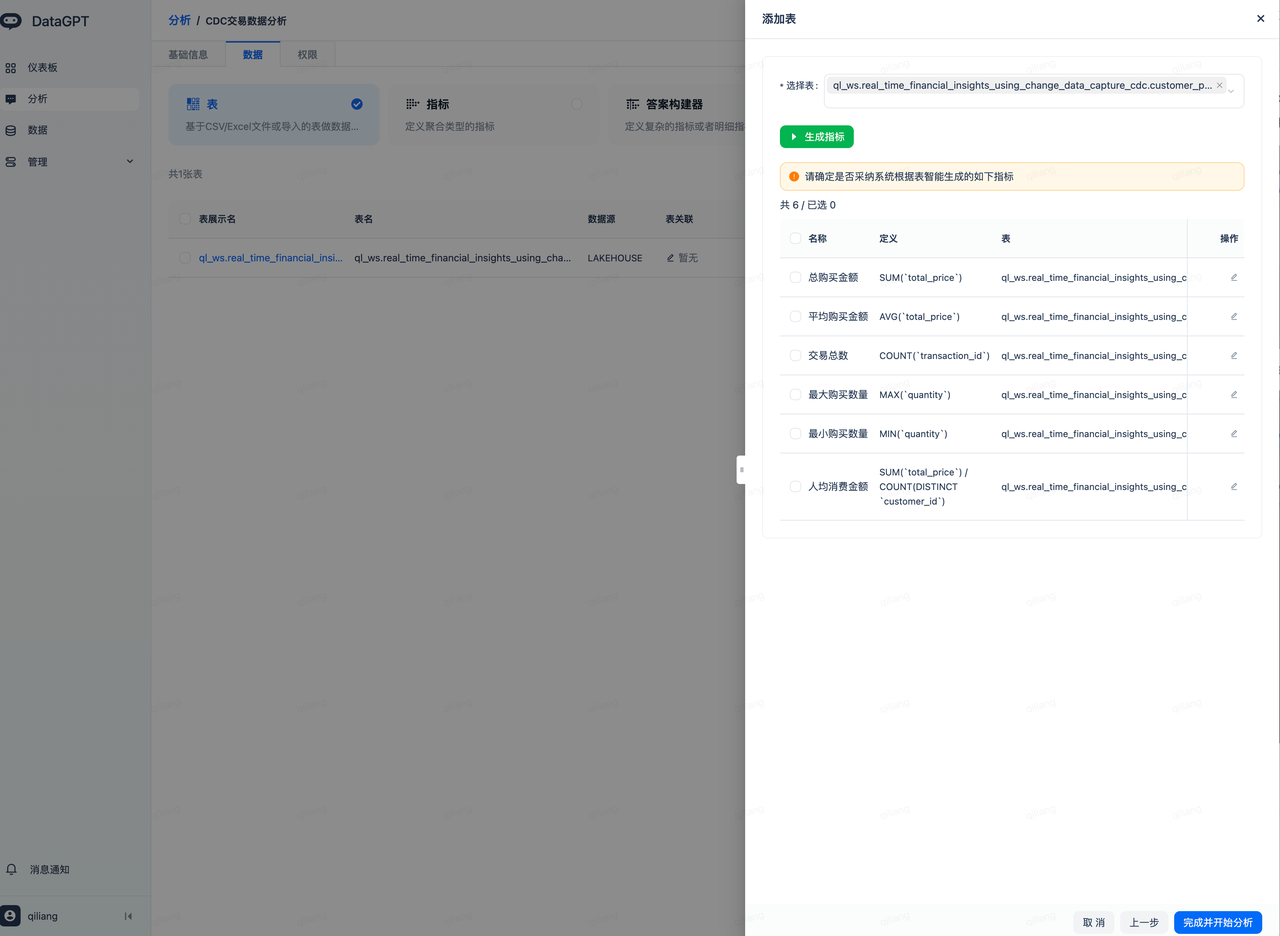
- Accept the automatically generated metrics from the LLM and complete the setup to begin analysis:
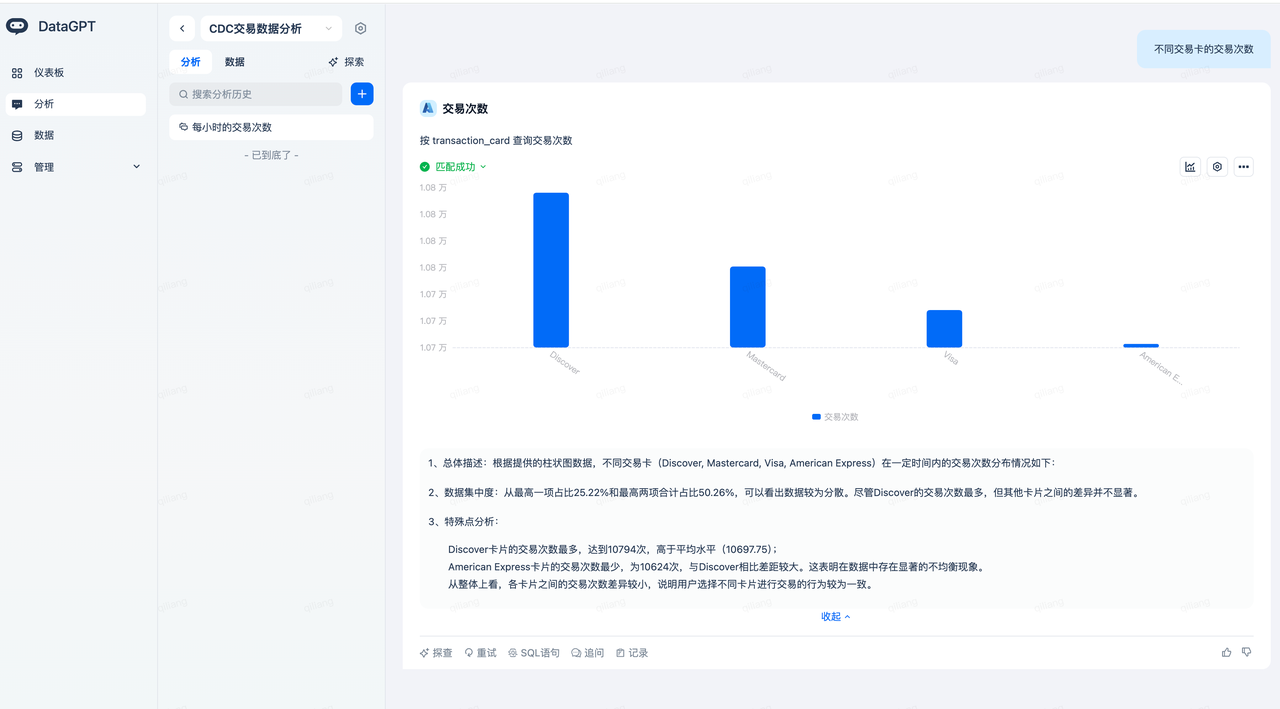
Once you enter the analysis domain page below, you can start data exploration and conversational analysis.
Data Exploration
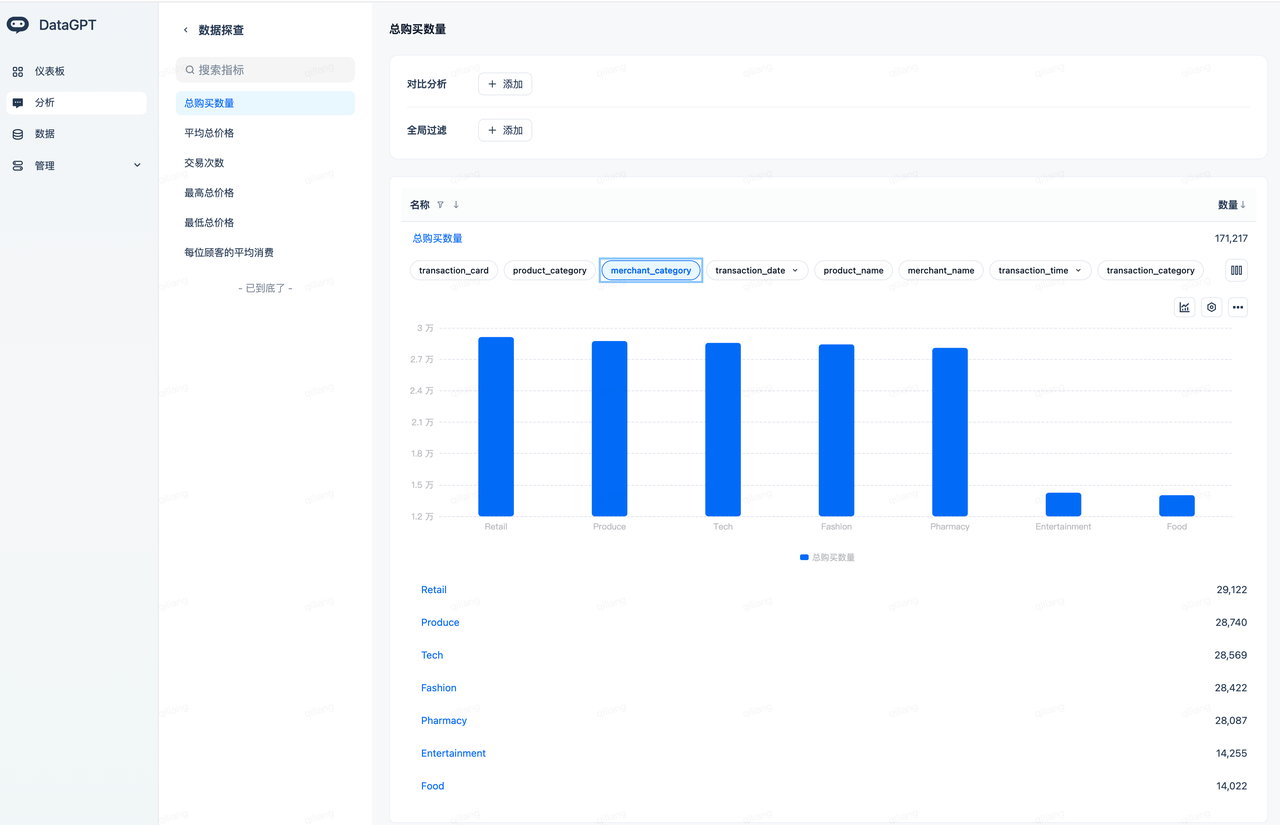
Navigate to the Analysis Domain (select "CDC Transaction Data Analysis") -> Explore to start exploring data based on the auto-created metrics.
Conversational Data Analysis
Enter the question "Number of Mastercard transactions, distributed by merchant category" to get the following analysis result:
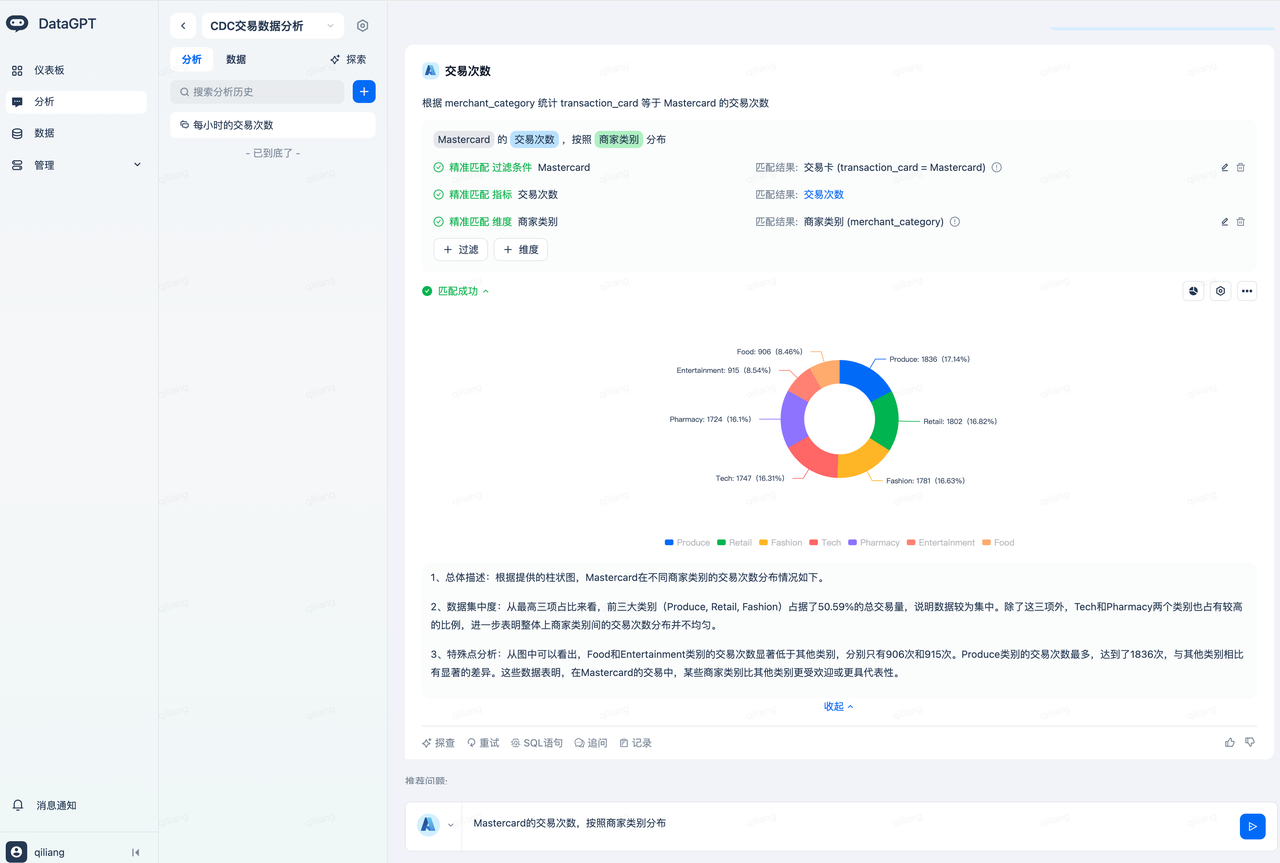
The system understood that "Mastercard" should match the transaction card (transaction_card = Mastercard). This is thanks to the Data Analytics Agent (DataGPT) automatically indexing the values of the transaction_card field.
Transaction count is a metric that was automatically created, achieving alignment of the metric's calculation definition.
Merchant category corresponds to the field merchant_category, thanks to the automatic field description generation which quickly enabled semantic alignment.
Enter the question: What is the total number of transactions for purchasing 'Disinfectant Wipes' across each channel? The following analysis result is returned:

In the Lakehouse table, the product 'Disinfectant Wipes' is stored in English. When a user asks about 'Disinfectant Wipes' in Chinese, the Data Analytics Agent (DataGPT) automatically translates the query for a precise match, so users don't have to input the exact English term. This fully leverages the power of large language models to make data analysis simpler.
Cleanup
After completing this quickstart, you can clean up the objects created in Singdata Lakehouse.
Summary
Congratulations! You have completed this quickstart!
Key Takeaways
After completing this quickstart, you now have a deeper understanding of:
- How to use Singdata Lakehouse multi-table real-time sync to sync PostgreSQL data into Singdata Lakehouse tables — corresponding to the Extract (E) and Load (L) steps of the ELT process.
- Using Dynamic Tables to process data — corresponding to the Transform (T) step of the ELT process.
- Visually exploring data and performing conversational data analysis using the built-in Data Analytics Agent (DataGPT) in Singdata Lakehouse.
Resources
Singdata Lakehouse Multi-Table Real-Time Sync
Singdata Lakehouse Dynamic Tables
Singdata Lakehouse Conversational Data Analysis — Data Analytics Agent (DataGPT)
Singdata Lakehouse Studio: Web Development and Management Tool